

Align Phase Between Tracks in Five Minutes Using Your DAW
Last Edited: Sep 24, 2026
Fix phase problems in this order: flip polarity on any suspect mic, pick one track as your reference, nudge the rest to match transients within a few samples, then confirm with a null test and a mono check. Most fixes land within a few samples of offset. Run this routine in a DAW with sample-accurate editing, and you’ll catch most phase issues before you ever touch an EQ.
TL;DR:
- Phase issues are best fixed by flipping polarity on suspect mics, aligning tracks by transient nudging, and verifying with null tests and mono checks.
- Manual alignment requires sample-accurate zoom, transient matching, polarity inversion, and careful documentation for long-term consistency.
- Auto-align tools excel in large multitrack sessions but need manual verification, especially with complex or distorted signals.
- Verification with null tests, mono summing, and spectrum analysis ensures phase problems are fully corrected before final processing.
- Prioritizing correction on low-end and critical mic pairs prevents low-frequency cancellation, while wider pairs may benefit from intentional, measured offsets for width.
Quick Session Checklist: 6 Fast Checks That Surface Most Phase Problems
Before you nudge a single waveform, run this diagnostic pass. It takes less time than reading about it, and it’ll tell you exactly where your session’s problems live.
- Flip polarity on the usual suspects. Snare bottom mics, reversed DI signals, and any mic wired backward through a patch bay are the most common culprits. Flip and listen.
- Run a null test. Invert one track against its pair and listen for cancellation. A tight null means good alignment; leftover thickness or hollowness means you have work to do.
- Solo pairs and zoom in on the transient. Look at the actual waveform shape, not just the meter. Nudge one track in sample increments until the attacks line up visually and audibly.
- Check mono, then check stereo. Cancellation that hides in a wide stereo image often becomes obvious the moment you sum to mono. If your kit disappears in mono, you have phase trouble.
- Glance at a correlation meter. Readings near +1 mean tracks reinforce each other; readings drifting toward −1 flag cancellation. Pair that with a phase alignment overview from Unison, which explains how misalignment produces comb filtering and a hollow, thinned-out tone.
- High-pass the rumble. Roll off 30 to 40 Hz on layers that don’t need it. Sub-bass phase conflicts below the audible transient range add mud, not punch.
Pro Tip: Do this checklist before you touch a single EQ or compressor. Fixing phase after you’ve already shaped the tone means redoing your processing from scratch.
Manual Phase Alignment Techniques: Nudging, Transients, and Polarity
Manual alignment is slower than clicking an auto-align button, but it gives you total control, and it’s the only reliable method when transients get complicated or a mix has been heavily processed.
Set up a safe workflow first
Duplicate your reference track before you touch anything and mute the duplicate. That gives you an untouched anchor to compare against if an edit goes sideways. Label it clearly. Nothing wastes more session time than forgetting which version was the original.
Zoom in and find the transient
Zoom to sample resolution on both tracks and look for the sharpest point of the transient, usually the initial spike of a kick, snare crack, or vocal consonant. DAWs like Pro Tools support “tab to transient” navigation that jumps your cursor straight to that peak, a workflow detailed in CRAS’s time-align quick tip. Start your nudge at roughly 10 to 20 samples and refine from there.
Nudge versus time-stretch
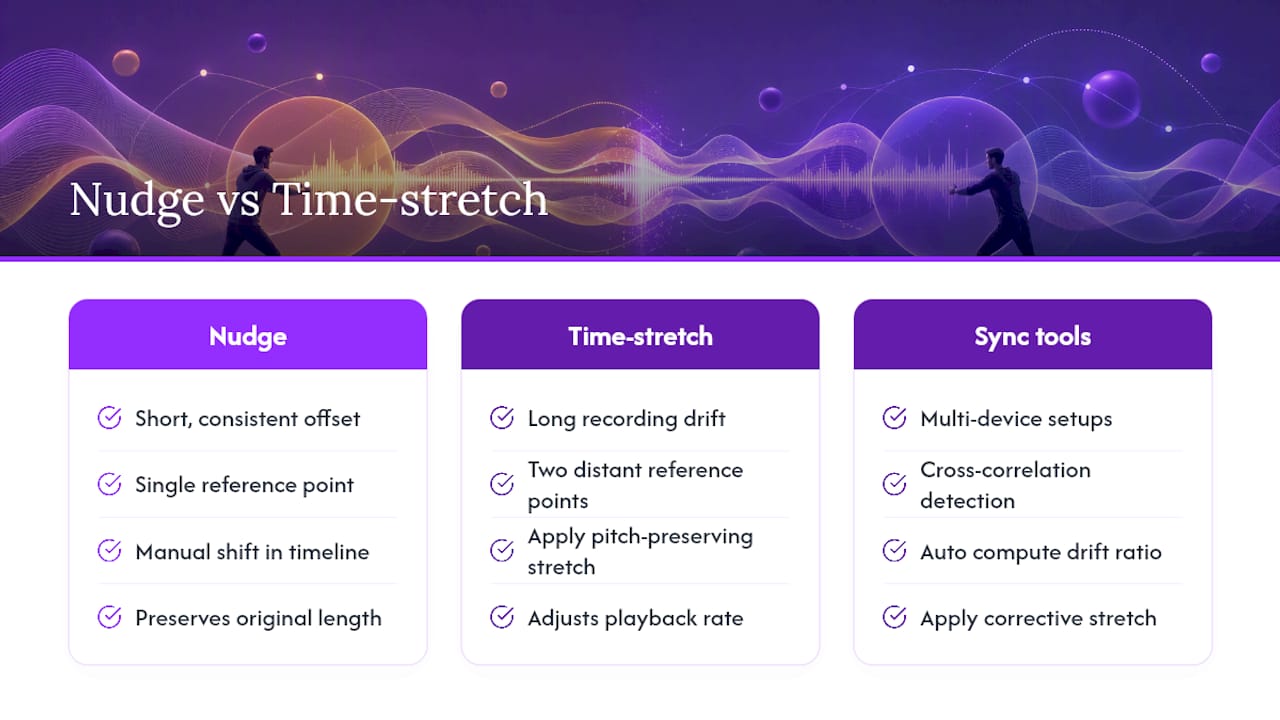
Short, consistent offsets call for a simple nudge. But if you’re working with a long recording where two devices drifted apart over several minutes, whether from clock mismatch or a phone recorder with an inconsistent sample clock, a flat nudge won’t fix it. You need to find two reference points far apart in the timeline, calculate the drift ratio between them, and then apply a pitch-preserving time stretch. Tools built for multi-device audio and video synchronization use cross-correlation to automatically detect that kind of drift, which is worth reaching for once you’re dealing with more than a handful of milliseconds of accumulated error.
Document what you did
Drop a marker or a track note every time you commit a phase edit. Six months from now, when you reopen the session, you’ll want to know why that overhead track sits 14 samples ahead of the kick mic. Once you’re confident in an alignment, bounce the grouped tracks together so the relationship is locked and can’t drift during later edits. Soundbridge’s step-by-step editing guide walks through session hygiene practices that make this kind of documentation second nature.
Pro Tip: Nudge in odd, small numbers, like 3 or 7 samples, rather than always defaulting to round numbers like 10. Phase relationships don’t care about tidy math, and the tightest alignment point rarely lands on a clean multiple of ten.
Automatic Tools and DAW Features: When to Use Them and What to Watch For
Auto-align features measure the correlation between two waveforms, calculate the delay offset that yields the tightest match, and apply that shift automatically, sometimes flipping polarity as well if it improves the correlation score. DAWs, including Reaper, have built native phase-alignment actions directly into their toolsets, eliminating the need for a dedicated plugin for straightforward jobs.
Auto tools earn their keep on:
- Large multitrack drum sessions with eight or more mics to reconcile
- Sessions with dozens of takes where manual alignment would eat your whole afternoon
- Remote-recorded stems where each performer tracked independently, and timing needs reconciling before a mix even starts
Manual alignment still wins when transients are ambiguous, a signal is heavily distorted, or a source has been through enough processing that the algorithm can’t find a clean correlation peak. A fuzzed-out bass DI, for example, often confuses auto-align tools because the transient shape gets smeared by clipping.
Whichever route you take, don’t trust the result blindly. After running an auto-align pass, check that the software actually picked the reference you intended, not a competing signal in the same track group. Zoom in and inspect the transient to confirm it wasn’t smeared or duplicated. Then run your null and mono checks exactly as you would after a manual edit.
Watch for three common failure patterns: conflicts that only exist in the low end while the highs are fine, clipped or heavily compressed signals that scramble the correlation math, and situations with multiple simultaneous reflections, like a snare picked up by four different mics at once, where the algorithm can’t decide which relationship to prioritize. When any of these show up, split your processing into frequency bands and align the low end separately from the transient content, an approach Unison’s phase alignment guide recommends specifically for sources that mix wideband and sub-frequency energy.
Verification: Null Testing, Mono Checks, and Spectrum Analysis
Verification isn’t optional. It’s the step that turns a guess into a confirmed fix, and skipping it is how phase problems sneak into a final master unnoticed.
- Run the null test. Invert one track’s polarity against its aligned pair and listen. Near-perfect alignment produces substantial cancellation, described in detail in Eventide’s Precision Time Align manual. Residual thickness or a hollow ring after inversion indicates that the timing or spectral content still doesn’t match.
- Check mono compatibility. Summing to mono exposes cancellation that stays hidden in a wide stereo field. If a track group thins out or loses low end in mono, that’s your signal that something is still off.
- Watch a correlation meter and spectrum analyzer together. Readings should sit closer to +1 than −1 after alignment. On the spectrum analyzer, look specifically for dips carved into the 100 to 400 Hz range, the classic fingerprint of comb filtering from phase cancellation, a pattern Unison’s guide calls out as the signature of misaligned mics.
- Slow down and listen on purpose. Play the section back at reduced speed if your DAW supports it, and focus specifically on the transient region. Do this before and after your edit so you have a real comparison, not a memory of one.
Practical guides on phase correction note that very small shifts can be audible on transient-heavy sources, according to DepartureMusic’s phase alignment techniques guide. That’s a fraction of a single video frame, small enough that your eyes will miss it on a waveform but your ears will catch it every time. Trust both your meters and your ears. Meters catch what fatigue hides from you late in a session; ears catch musical context a correlation number can’t measure.
Recipes for Common Phase Problems: Drums, Subs, Overheads, and Stacks
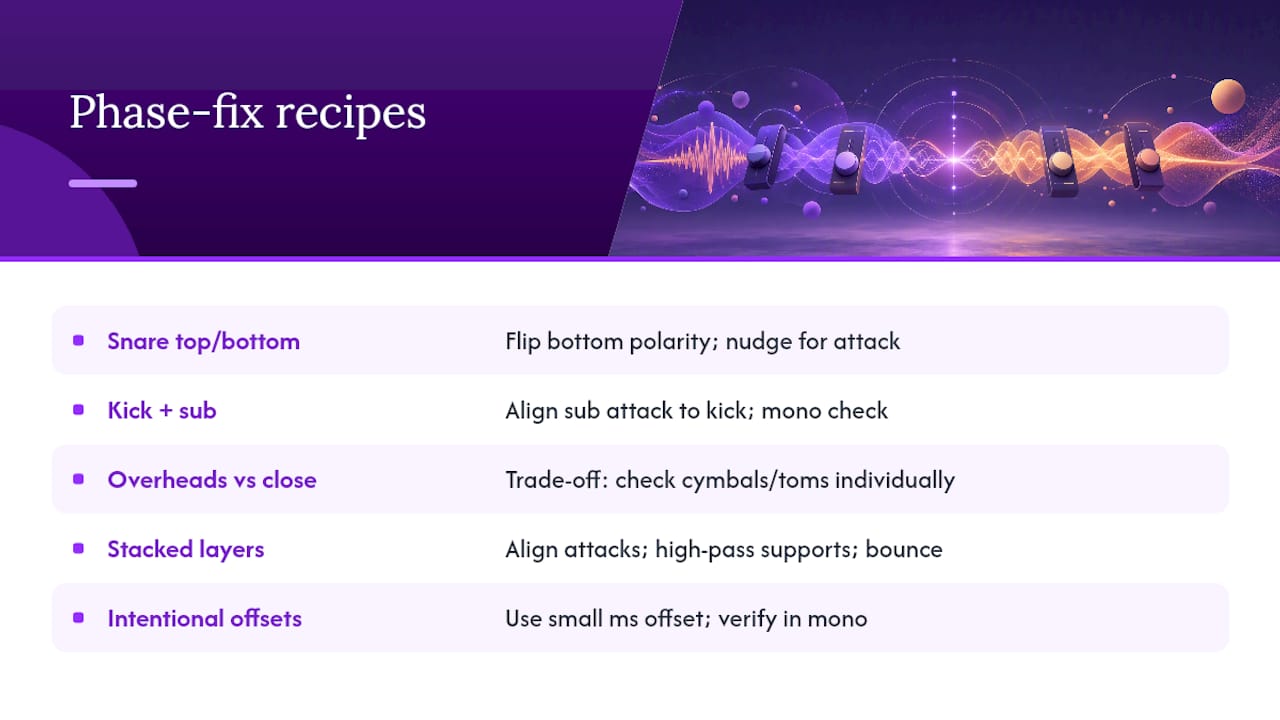
Snare top and bottom. Flip the bottom mic’s polarity first; it’s almost always wired to pick up the opposite side of the head’s motion. Then nudge for the tightest, snappiest attack. If the snare sounds thin or papery even after the flip, you’re probably still misaligned in time, not just polarity.
Kick and 808 or sub layer. Prioritize the low-frequency transient arrival over anything else. Nudge the sub so its fundamental hits at the same instant as the kick’s punch, then confirm the low end holds together in a mono check. A weak or disappearing low end in mono almost always traces back to this pair.
Overheads versus close mics. This one’s a trade-off, not a clean fix. Aligning overheads perfectly to the kick and snare close mics can rob cymbals of their natural shimmer, since the mics are physically farther away and picking up genuinely later arrivals. Check phase relationships across toms and cymbals individually rather than assuming one blanket offset works for the whole overhead pair, and lean on drum layering techniques built around preserving that kind of natural mic spacing.
Stacked samples and vocal doubles. Line up the attacks first, high-pass any supporting layer that doesn’t need low end, and once you’re happy with the blend, commit by bouncing the stack into one grouped file. That locks the phase relationship permanently and stops it from drifting during later edits.
Intentional offsets for width. Sometimes a small, measured offset, a handful of milliseconds between two vocal doubles or two guitar takes, adds genuine width instead of causing cancellation. The difference between “creative width” and “phase problem” is whether you chose the offset on purpose after checking it in mono, or whether it’s an accident you never verified.
Pro Tip: Reference the kick-and-808 pairing against instrument-punch techniques if your low end sounds correct in solo but disappears once the full mix comes in. That’s often a masking issue layered on top of a phase issue, and fixing one without checking the other wastes time.
Building a Repeatable Phase Alignment Workflow
Turn everything above into a fixed sequence and phase stops being a fire drill; it becomes a five-minute step in your template.
- Set gain staging and routing first, before any alignment work, so you’re comparing signals at usable levels.
- Run your polarity check across every mic pair prone to inversion.
- Pick a clear reference track, usually your closest, most transient-rich mic.
- Align manually or with an auto-align feature, depending on session size and source complexity.
- Verify with a null test, mono check, and spectrum analyzer before moving on.
- Commit the decision: bounce grouped tracks and drop a marker noting the offset you applied.
For sections where timing shifts mid-performance, like a drummer who rushes the chorus, automate the offset rather than applying one static nudge across the whole song, and note in a track comment exactly where and why the automation kicks in. Soundbridge’s guide to essential audio editing techniques covers the broader editing habits that make this kind of documentation stick session after session.
DAW Capabilities That Matter for Precise Alignment
Sample-accurate phase work depends on the environment you’re doing it in, not just the technique.
- Support for high sample rates, up to 192kHz on Soundbridge, gives you finer time resolution when nudging by individual samples rather than milliseconds.
- Zero-latency remote tracking with studio-accurate sync matters when your band or session players record from separate locations; Soundbridge keeps that sync tight so alignment work later isn’t fighting an already-drifted foundation.
- An intuitive, modular workflow means you’re not hunting through menus mid-session to find a delay or polarity control when your ears just caught a problem.
- Setting up a safe alignment pass is straightforward: duplicate your reference into a muted track, group the mics you’re correcting, and commit the offsets once you’ve verified them, rather than editing live on your only copy.
Balancing Technical Alignment and Musical Judgment
The instinct to chase a perfect null test on every track pair is understandable, and it’s also a good way to waste an afternoon. Technical cancellation fixes matter most on the pairs doing real structural work: kick and sub, snare top and bottom, the mic pairs where misalignment audibly steals low end or thins out an attack. Everywhere else, especially wide overhead pairs or doubled vocal takes, a small offset that never shows up as cancellation in mono is often adding character, not causing a problem.
Budget your session time accordingly. Fix the pairs that fail a mono check now. Leave the pairs that pass mono but carry a few milliseconds of natural spacing alone; that’s usually width, not damage. A mix that measures perfectly on a correlation meter but sounds flat and narrow has usually been over-corrected.
— Wake
Try These Phase Workflows Inside Soundbridge
This workflow depends on sample-accurate editing, polarity tools, and a high-resolution audio engine, ideally without forcing you to bounce between a DAW and a separate alignment plugin for every check. High session sample rates mean your nudges land with true precision rather than rounding to the nearest millisecond, and remote tracking features can keep stems in sync from the moment recording starts, minimizing the need to correct for drift.

If you’re still working out what a modern DAW should handle for you versus what you should be doing by hand, Soundbridge’s guide to digital audio workstations is a solid starting point before you commit to a workflow. From there, open a session, duplicate a reference track, and run the checklist above on your next multi-mic recording to see how much tighter your low end gets.
Sources
- Pro Tools quick tip: How to time align tracks — CRAS
- Precision Time Align user guide — Eventide (manual excerpt)
- Phase Alignment 101: How to Achieve Perfectly Balanced Tracks — Unison
- Mastering DAW phase alignment techniques for engineers — DepartureMusic
- AudioSync Pro — multi-device audio & video synchronization
Recommended
MASTER MUSIC PRODUCTION
Expert-led courses designed to take you from fundamentals to finished tracks.

HOUSEFrom bouncy bass and solid kicks, this course teaches you the most modern House music production techniques needed to succeed and stand out.

TRAPQuit sounding like generic Trap and produce something World with hints of the Far East. Create ethnic soundscapes to put your Trap ahead of the curve.

AMBIENTProduce relaxing, sophisticated psy-influenced ambient. Psychedelic and relaxing to listen to, create meditative soundscapes to put your listeners in Zen.