

Post Engineers: Avoid 3.6s/hr Drift in Frame Rate Mismatch Audio
Last Edited: Sep 16, 2026
Start by checking sync at the first frame and the last frame of your clip. A constant gap at both points means offset, fixed with a simple timeline nudge itsoffset. A growing gap indicates drift, almost always caused by a variable frame rate (VFR) source or a sample-rate mismatch between recorders. Diagnose which one you have before touching anything else.
TL;DR:
- Frame rate mismatches between source and timeline cause progressive drift of several seconds over long clips, especially with VFR files.
- Inspecting both the start and end of a clip is essential to detect drift, offset, or jitter issues effectively before applying fixes.
- Converting variable frame rate to constant frame rate or resampling audio ensures stable sync and prevents further drift during editing.
- Prioritize timestamp regeneration and simple offset nudges over re-encoding, reserving full re-encodes for significant frame rate problems.
- Lock all recording equipment to 48 kHz and transcode VFR sources immediately to prevent the majority of sync issues from occurring in post-production.
Quick Diagnosis Checklist: Is It Offset, Drift, or Jitter?
Run a two-point test before you open any menu. Check lip-sync at the very first frame, then check it again at the last frame of the same clip. Write down the delta in milliseconds at each point.
If that delta stays the same from head to tail, you’re dealing with a constant offset. Something shifted the whole audio track early, and a flat nudge fixes it everywhere. If the delta grows the further you get into the clip, that’s progressive drift, and it points to a frame-rate mismatch or a sample-rate conflict between your recording devices. If instead you hear stutter, clicks, or unpredictable skips rather than a smooth growing gap, that’s jitter from playback or device processing, not an editing problem at all.
Three tools settle the question quickly:
- FFprobe — run it against your file and compare
r_frame_rate(the declared rate) againstavg_frame_rate(the actual measured rate). A mismatch between the two is a strong VFR signal. - MediaInfo — gives you a fast visual readout of frame rate mode, sample rate, and codec details without touching a terminal.
- Waveform zoom — zoom into the head and tail of your timeline in your NLE and eyeball whether a transient (a clap, a hard consonant) lines up with its matching video frame.
Pro Tip: Always test at the tail of the clip, not just the head. A file can look perfectly synced in the first ten seconds and drift by a full second or more by the ten-minute mark, and that only shows up if you check both ends.
Common Causes: VFR vs CFR, Frame Rate Math, and Clock Drift
Every professional NLE timeline assumes a constant frame rate (FR), meaning every frame occupies an identical, predictable slice of time. Variable frame rate, or VFR, lets frame duration change on the fly. Phones and screen recorders love VFR because it saves storage when nothing’s moving on screen, but it’s a poor match for editing timelines that expect a fixed clock.
The math behind frame-rate drift is more approachable than it looks:
- 23.976 fps timed against a 24 fps timeline creates a 0.1% speed difference, which works out to roughly 3.6 seconds of drift per hour. Over a 90-minute feature, that’s more than five seconds by the credits.
- 29.97 fps against 30 fps produces the same 0.1% gap, since it’s the identical NTSC/film rate relationship, just at a different frame count.
Sample-rate mismatch works on the same principle but from the audio side. Recording at 44.1 kHz and dropping that file into a 48 kHz project without resampling means every second of audio plays back at the wrong speed, and the gap compounds the same way frame-rate drift does. Mismatched sample rates commonly cause this kind of progressive speed drift, and it’s especially common when combining a camera’s internal audio with a separate field recorder that wasn’t locked to the same clock.
Separate recorders introduce a subtler version of the same problem: crystal oscillator drift. Two devices, even when set to the same sample rate on paper, run on separate internal clocks that tick at slightly different speeds. Over a short take, that’s invisible. Over a 40-minute interview, it can push audio and video apart by a noticeable margin.
None of this should be confused with playback jitter, which isn’t drift at all. A soundbar or TV that consistently delays audio by a fixed amount has a device-side latency issue, adjustable via an audio delay setting on the hardware itself, and it behaves as a constant offset rather than a growing one.
How to Fix Frame Rate Mismatch Audio: Inspect, Rebuild, Convert, Resample
Work from the least invasive fix to the most invasive. Re-encoding should be your last resort, not your first move.
1. Inspect the file before you do anything else. Run FFprobe against the clip:
ffprobe -v error -select_streams v:0 -show_entries stream=r_frame_rate,avg_frame_rate,start_time -of default=noprint_wrappers=1 input.mp4
Compare the two frame rate values it returns. If r_frame_rate and avg_frame_rate don’t match, you’re looking at VFR. Note the start_time too, since a nonzero value often explains a fixed offset before you even get to frame rate questions.
2. Rebuild timestamps first, before jumping to a re-encode. Missing or corrupted presentation timestamps (PTS) can masquerade as drift when the real fix is much cheaper:
ffmpeg -fflags +genpts -i input.mp4 -c copy output.mp4
This regenerates timestamps without touching a single pixel or audio sample, and it resolves a surprising number of sync complaints that look like frame rate errors but aren’t.
3. If the delta is a fixed offset, skip re-encoding entirely. Either nudge the audio clip on your timeline by the exact millisecond value you measured in the diagnosis step, or apply it at the container level:
ffmpeg -itsoffset 0.5 -i audio.wav -i video.mp4 -c copy output.mp4
That example shifts audio 500 milliseconds later; use a negative value to pull it earlier.
4. If the delta grows, convert VFR to CFR. In HandBrake, this means checking the Constant Framerate option rather than “Same as source,” which will happily pass VFR straight through. Set an explicit target rate that matches your project rather than trusting an automatic guess.
In FFmpeg, use -fps_mode cfr alongside a declared target rate:
ffmpeg -i input.mp4 -fps_mode cfr -r 23.976 -c:v libx264 -c:a copy output.mp4
Pick the rate your FFprobe check reported as the intended r_frame_rate, not an arbitrary round number.
5. If sample rate is the root cause, resample rather than time-stretch. Time-stretching audio to fake a frame rate correction distorts pitch and transients. Resampling preserves them:
ffmpeg -i input.wav -ar 48000 output.wav
Resample audio to your project’s 48 kHz standard whenever the source was captured at 44.1 kHz, and do this before you touch anything else in the timeline. A DAW-based resample often gives you a cleaner result than a blind command-line pass, since you can audition the output before committing.
6. If drift remains after all of the above, calculate the exact correction. Measure how far the sync has drifted between the start of a clip and the end, then compute the ratio:
new_rate = original_rate × (duration_at_start / duration_at_end)
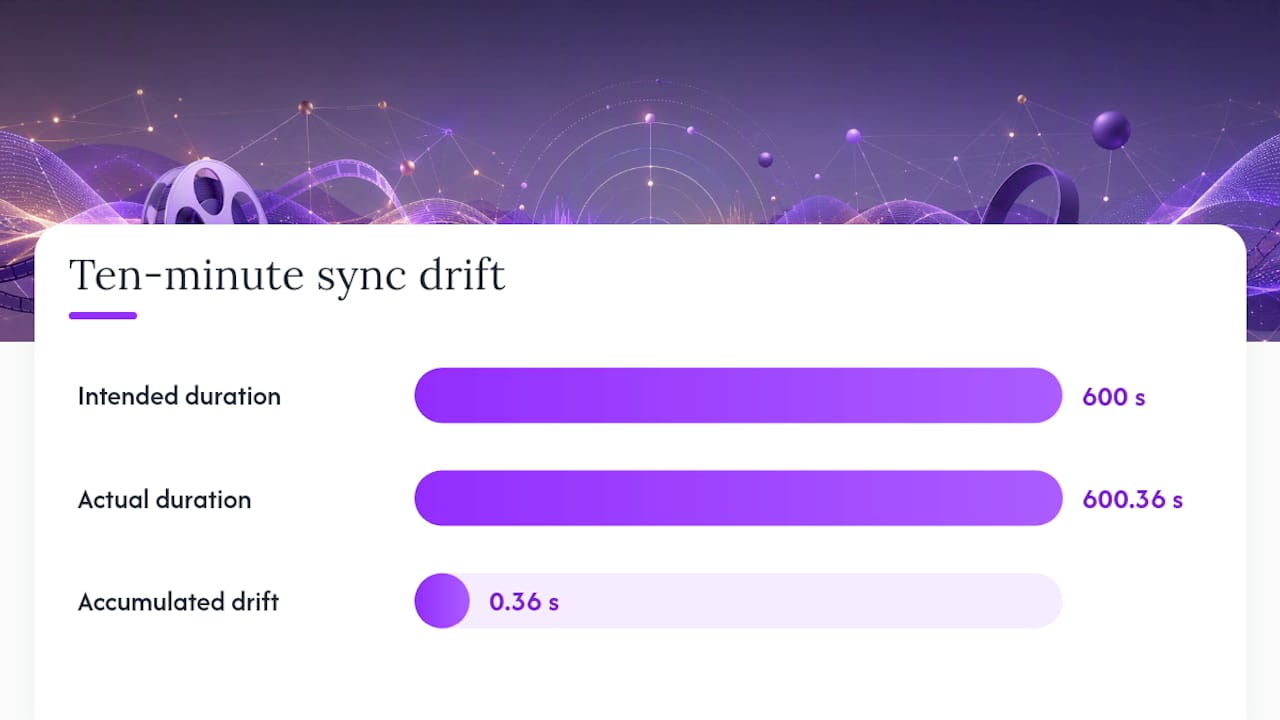
If a ten-minute clip has drifted 0.36 seconds by the end, your correction factor is roughly 600 / 600.36, or 0.9994. Apply that as a precise rate change or time-stretch in your DAW rather than eyeballing it.
Pro Tip: Whenever you re-encode video, copy the audio stream instead of re-encoding it (-c:a copy). Re-encoding audio you don’t need to touch introduces generational quality loss for zero benefit.
A graduated approach that starts with timestamp fixes and light filters like -af aresample=async=1 before reaching for a full CFR re-encode saves both processing time and quality, especially on long-form footage where a full re-encode can take hours.
How Do You Verify Sync After Applying a Fix?
Never trust a single spot-check. Sync problems love to hide in the middle of a file and only announce themselves at the two-minute mark of a ninety-minute cut.
- Re-run the start/end alignment check you used for diagnosis, comparing the delta at frame one against the delta at the final frame.
- Zoom into the waveform at both the head and tail of the timeline and confirm a transient (a clap, a door slam, a hard consonant) lines up visually with its video frame.
- Run FFprobe again on the exported file and confirm
r_frame_rateandavg_frame_ratenow match, with astart_timeat or near zero. - Play the full export, not just a trimmed preview, on at least two different players or devices, since some players apply their own correction and can mask a problem that will surface elsewhere.
- For a scripted gut check, pull duration and frame count from
ffprobe -show_format -show_streams -of jsonand confirm they match your expected runtime within a frame or two.
Keep in mind that human ears catch small audio glitches far more readily than small video anomalies, which is one reason audio often serves as the reference clock during QA rather than video. If the audio sounds locked in on a wired headphone check, you’re usually in good shape even if a compressed preview looks slightly off.
Prevention: Recording and Pipeline Standards Worth Locking In
Fixing frame-rate-mismatched audio after the fact works, but a few standing rules on set and in your ingest pipeline prevent most of this from ever reaching your timeline.
- Standardize every recorder and every project on 48 kHz. Lock cameras, field recorders, and your DAW session to the same rate before a single take rolls.
- Transcode any VFR source, phone footage, and screen recordings especially, to CFR immediately on ingest, before it ever touches an editing timeline.
- Record a reference clap or slate at the head of every take, and use timecode sync or genlock across cameras and recorders whenever your gear supports it.
- Monitor on wired headphones during the shoot, not Bluetooth, since wireless audio adds its own variable latency that can mislead you about what’s actually being recorded.
- Keep individual takes on separate recorders shorter rather than running one continuous hour-long file, since clock drift accumulates with runtime and shorter takes cap how far it can travel.
- Log each device’s declared sample rate and frame rate in your production notes so a post editor isn’t guessing weeks later.
Pro Tip: A five-second reference clap at the start of every setup costs you nothing and turns a guessing game into an exact millisecond measurement during your first sync pass.
When Should You Move Audio Into a DAW for Precision Correction?
Command-line fixes handle most frame rate mismatch audio problems, but a few situations call for a proper DAW instead of another FFmpeg pass: batch-processing dozens of takes from a multi-day shoot, correcting drift with a high-quality time-stretch algorithm rather than a linear resample, or fine-tuning sync on a piece with picture lock already in place. SoundBridge supports native video import alongside high-quality time-stretching, so you can watch the picture while nudging or stretching audio in the same window, rather than round-tripping between apps. When sample-rate mismatch is the actual root cause, the cleanest sequence is resample, export, and re-import, confirming the fix visually against picture before you commit to a final mix.
Triage Rules for Deadline Work
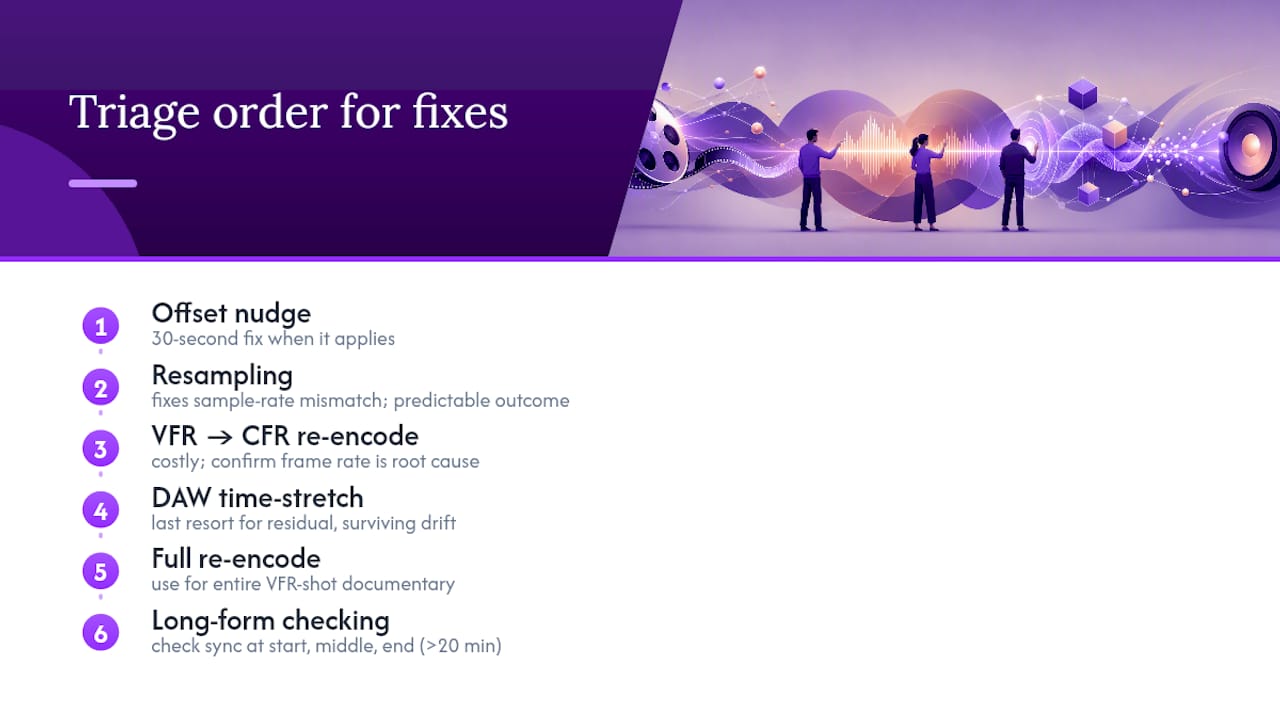
Under deadline pressure, the fastest fix that solves the actual symptom beats the most thorough one every time. My triage order runs offset nudge first, since it’s a thirty-second fix when it applies. Resampling comes next, because a mismatched sample rate is a mechanical fix with a predictable outcome. VFR to CFR re-encoding comes third, since it costs real processing time and should only happen once you’ve confirmed the frame rate is genuinely the problem, not the timestamps. DAW-based time-stretching is the last resort, reserved for residual drift that survives everything else.
A full re-encode is overkill for a single dialogue clip with a clean fixed offset. It’s the right call for an entire VFR-shot documentary that’s going into a multi-camera cut. For long-form interviews, checking sync at three points — start, middle, and end — instead of two catches drift that a two-point test sometimes misses in footage longer than twenty minutes.
— Wake
A DAW Built for Precision Post Work
Certain DAWs provide a direct way to fix sample-rate mismatches and residual drift without bouncing between multiple applications. With support for native video alongside high-fidelity audio processing, you can watch your locked picture while applying a resample or a transparent time-stretch in the same session, rather than guessing at sync in a command-line tool and reopening your NLE to check the result.

That matters most on the residual-drift cases this guide covers last, the ones where a linear FFmpeg resample gets you close, but a proper time-stretch algorithm is what actually locks picture and sound together cleanly. If you’re new to working this way, the DAW guide for post-production workflows walks through how a modern DAW handles video-referenced audio editing from import to export. Open a project, drop in your drifting file, and run the resample-export-reimport sequence described above to confirm the fix before it goes back into your cut.
Sources
The commands and thresholds in this guide draw from a small set of trusted technical sources. Descript’s drift repair notes quantify the exact seconds-per-hour math behind 23.976/24 fps mismatches. The FFmpeg sync-repair reference documents the FFprobe fields and flags used throughout the inspection and rebuild steps. FFmpeg Cookbook’s guide to out-of-sync audio lays out the graduated timestamp-first approach. AudioUtils covers sample-rate mismatch fixes in more depth, and GetStream’s AV sync explainer covers perceptual tolerance thresholds relevant to QA. HandBrake and MediaInfo remain the standard free tools for VFR detection and conversion outside the command line.
- Repair audio drift — Descript help
- sync-repair.(TextOps media-fixing-and-repair)
- Audio Out of Sync? Causes and Fixes | AudioUtils
- AV sync and WebRTC streams — GetStream blog
Recommended
MASTER MUSIC PRODUCTION
Expert-led courses designed to take you from fundamentals to finished tracks.

HOUSEFrom bouncy bass and solid kicks, this course teaches you the most modern House music production techniques needed to succeed and stand out.
TRAPQuit sounding like generic Trap and produce something World with hints of the Far East. Create ethnic soundscapes to put your Trap ahead of the curve.

AMBIENTProduce relaxing, sophisticated psy-influenced ambient. Psychedelic and relaxing to listen to, create meditative soundscapes to put your listeners in Zen.