

Gain Staging Tutorial: Clean Mixes From Start to Finish
Last Edited: Jul 14, 2026

Gain staging is the process of managing signal levels at each stage of your recording and mixing chain to preserve dynamic range, prevent clipping, and ensure plugins perform at their best. The industry-standard target for digital gain staging is approximately -18 dBFS RMS, which aligns with the analog reference level of 0 VU. That single number is the anchor of every gain staging decision you make. Get it right, and your plugins respond naturally, your mix stays clean, and your master bus has room to breathe. Miss it, and you spend hours fighting distortion, harshness, and a mix that refuses to translate.
What Is Gain Staging, and Why Does It Matter?
Gain staging is not the same as mixing. Mixing is about balance and creativity. Gain staging is about keeping every signal within its optimal operating range before any creative decisions are made. Think of it as setting the table before the meal.

The two most important terms to separate are gain and volume. Gain controls input level before your plugins process the signal. Volume controls output level after processing. Gain staging should always happen with clip gain or a trim plugin at the top of your insert chain, not with the channel fader. Channel faders belong to mix balance, not signal management.
Here are the core concepts you need to understand before touching a single knob:
- Clip gain/trim: Adjusts the level of an audio clip or track before any inserts are applied. This is your primary gain staging tool.
- Unity gain fader: A channel fader set to 0 dB, passing the signal without adding or subtracting level. Channel faders near unity preserve automation resolution and keep your mix flexible.
- Headroom: The space between your average signal level and 0 dBFS. More headroom means more room for transients and dynamics.
- Signal chain stages: Every point where a signal passes through a device or plugin is a stage. Each stage needs its own gain check.
- RMS vs. peak: RMS measures average loudness. Peak measures the highest momentary level. Both matter, but for different reasons.
Pro Tip: Set your channel faders to 0 dB before you start gain staging. Use clip gain to hit your target level, then use the fader only for mix balance decisions.
How to Set Gain Staging Levels Properly in a DAW
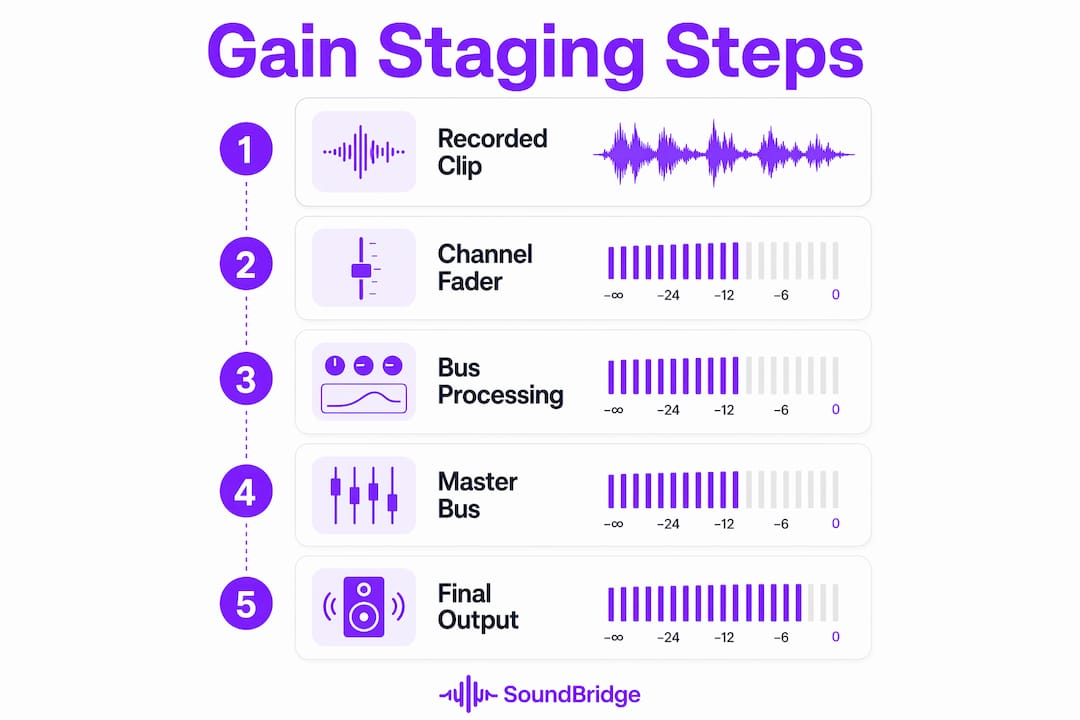
A solid gain-staging workflow follows the signal from the source to the master bus. Each step builds on the last. Skip one, and the problems compound.
Step-By-Step Gain Staging Workflow
- Set clip gain at the source. Open your clip gain or trim control and adjust until your audio reads approximately -18 dBFS RMS on an RMS meter. This is your target for recorded audio and audio clips.
- Check your peak levels. Recording peaks should not exceed -6 dBFS to maintain headroom and protect against transient spikes. If peaks are hitting higher, pull the clip gain down further.
- Manage virtual instrument outputs. Many virtual instruments default to near 0 dBFS. Reduce synth output by 10-15 dB to reach the -18 dBFS RMS target before any processing begins. This single step saves most producers hours of troubleshooting.
- Apply makeup gain after each gain-reduction plugin. Every compressor or EQ that reduces level needs makeup gain to restore the signal to the target window. Place a utility or trim plugin after the compressor and bring the level back to approximately -18 dBFS RMS.
- Match plugin bypass levels. Before evaluating any plugin, match output gain to bypass level so you hear the plugin’s character, not just its loudness. Louder always sounds better to the human ear, which makes fair comparisons impossible without level matching.
- Check group and bus levels. When multiple tracks sum to a group bus, the combined level rises. Use a utility plugin on the bus to pull the summed level back into a healthy range before the bus hits your master fader.
- Leave headroom on the master bus. The master bus target is 3–6 dB of headroom before your limiter. Aim for -6 dBFS true peak at the limiter input. This gives your limiter room to work without crushing dynamics.
Pro Tip: Use a dedicated metering plugin on your master bus during the entire mix session. Watching RMS and true peak in real time trains your ears and eyes to work together.
| Stage | Target level | Tool to use |
|---|---|---|
| Recorded audio clip | -18 dBFS RMS | Clip gain/trim |
| Virtual instrument output | -18 dBFS RMS | Instrument volume or first insert trim |
| Post-compressor signal | -18 dBFS RMS | Makeup gain or utility plugin |
| Group/bus input | -18 dBFS RMS | Bus trim plugin |
| Master bus input | -6 dBFS true peak | Metering plugin + limiter |
What Are the Most Common Gain Staging Mistakes?
Most gain-staging problems stem from a handful of habits that feel intuitive but cause real damage to your mix. Recognizing them is the fastest way to fix them.
- Using faders instead of clip gain and pulling a fader down after inserts does not fix the signal going into those inserts. Your plugins have already received a hot signal and may have introduced distortion or noise. Gain staging with clip gain happens before any processing.
- Skipping makeup gain after compression. Skipping makeup gain after gain reduction is the most common error in the entire processing chain. The compressor reduces level, and every plugin after it receives a weaker signal than intended. The result is a thin, lifeless sound that no amount of EQ will fix.
- Ignoring virtual instrument levels. Synths and samplers often output near 0 dBFS by default. Feeding that level into your first insert plugin immediately pushes it into distortion territory. Always check instrument output levels before adding any effects.
- Driving plugins too hard without intention. Some producers accidentally push plugins into distortion by feeding them hot signals. The result is unpleasant digital clipping, not the warm saturation you get from intentional analog-modeled drive.
- Inconsistent levels across tracks. When different tracks hit your mix bus at wildly different levels, your bus compressor and limiter work unevenly. Consistent gain staging across all tracks makes bus processing more predictable and musical.
Pro Tip: After every compressor in your chain, insert a gain utility plugin and set it to restore the output to your target RMS. Make this a non-negotiable step in your template.
Applying these essential audio editing techniques alongside proper gain staging gives you a cleaner starting point for every subsequent mix decision.
How Does Advanced Gain Staging Work for Buses and Creative Uses?
Gain staging is not purely a technical discipline. It is also a creative production tool, and understanding that distinction separates competent producers from great ones.
“Clean gain staging supports clarity and transparency. Aggressive gain staging adds sonic character, warmth, and grit. Both are valid production choices. The key is knowing which one you are making and making it on purpose.”
The choice between clean and aggressive gain staging shapes the entire personality of a track. Driving an analog-modeled plugin with a hotter signal pushes it into saturation, adding harmonic content that makes sounds feel more alive and three-dimensional. This technique is especially effective on drums, bass, and guitars. The creative use of analog-style gain to add warmth and character has roots in hardware recording, where engineers deliberately pushed tape machines and preamps for color.
Managing gain on group and master buses requires a different mindset. When you sum eight drum tracks to a drum bus, the combined level can easily jump 6 to 10 dB above any individual track. A trim plugin at the input of the bus pulls that summed level back into range before your bus compressor sees it. This keeps your compressor working in its intended range, producing natural-sounding glue rather than pumping artifacts.
| Approach | Signal level | Result |
|---|---|---|
| Clean gain staging | -18 dBFS RMS | Transparent, dynamic, plugin-accurate |
| Aggressive gain staging | Above -18 dBFS RMS | Saturation, harmonic color, character |
| Bus trim before processing | -18 dBFS RMS at bus input | Controlled, predictable bus compression |
Every piece of audio equipment has an operational sweet spot, and staying within that range helps avoid noise-floor elevation and unintended distortion. The same principle applies to every plugin in your chain. Effective gain staging throughout the chain produces a healthier, more controllable final mix, with less need for corrective mastering. That is the real payoff.
For producers who want to push instruments forward in the mix without resorting to heavy compression, proper gain staging combined with smart EQ is the foundation. Learning how to make instruments punch through the mix starts with giving each track a clean, well-staged signal.
Key Takeaways
Proper gain staging at every stage of your signal chain is the single most effective way to achieve cleaner mixes, better-sounding plugins, and a master bus with room to breathe.
| Point | Details |
|---|---|
| Target -18 dBFS RMS | Set clip gain so your average signal reads -18 dBFS RMS before any plugins. |
| Use clip gain, not faders. | Faders control the mix balance; clip gain and trim plugins control the signal level into the inserts. |
| Always apply makeup gain. | Restore post-compressor levels with a utility plugin to keep the chain consistent. |
| Manage synth outputs early. | Reduce virtual instrument levels by 10–15 dB before adding any insert processing. |
| Leave master bus headroom. | Keep 3–6 dB of headroom before your limiter for dynamic, professional-sounding masters. |
Why Gain Staging Changed How I Hear Every Mix
Most producers learn gain staging the hard way. They build a mix that sounds great at low volume, then crank it up and hear a wall of harshness they cannot explain. The culprit is almost always a chain of plugins receiving the wrong input levels, each one compounding the problem of the last.
What changed my approach was treating gain staging as a discipline separate from mixing. I stopped thinking about it as a technical chore and started thinking of it as the foundation the mix sits on. When every track hits its plugins at -18 dBFS RMS, the plugins respond the way their designers intended. Compressors compress musically. EQs shape without adding artifacts. Saturators add warmth instead of grit.
My go-to workflow now includes a metering plugin on every bus and a trim plugin after every compressor. That second habit alone eliminated most of the harshness I used to fight in the final mix. Training your ears to hear the difference between a well-staged signal and an overdriven one takes time, but the meters provide an objective reference as your ears develop.
The creative side of gain staging is where things get genuinely exciting. Pushing an analog-modeled tape plugin with a hotter signal, then pulling back the output, gives you saturation without loudness. That technique is one of the most powerful tools in modern production, and it only works when you understand what you are doing and why.
Gain staging is not glamorous. No one posts about it on social media. But every producer whose mixes translate well has internalized it. Make it part of your template, not an afterthought.
— Wake
SoundBridge Makes Gain Staging Part of Your Natural Workflow
Applying gain-staging techniques is far easier when your DAW provides the right tools without getting in the way. SoundBridge includes clip gain controls, integrated metering, and a flexible insert chain that lets you place trim plugins exactly where you need them.

Whether you are building your first mix or refining your professional workflow, SoundBridge provides the environment to apply everything covered in this guide. The platform supports high-fidelity audio processing up to 192kHz, so your gain-staging decisions translate with full accuracy at every stage. Start with the DAW fundamentals guide to understand how SoundBridge fits into your production setup, then put your gain-staging workflow into practice in your next session.
FAQ
What is the correct gain staging level in a DAW?
The standard target is -18 dBFS RMS for average signal level, with peaks kept below -6 dBFS. This aligns with the analog 0 VU reference and keeps plugins operating in their intended range.
What is the difference between gain and volume in mixing?
Gain controls the input level before plugins process the signal. Volume controls the output level after processing. Gain staging uses clip gain and trim plugins, not channel faders.
Why should I use clip gain instead of the channel fader?
Channel faders set near unity (0 dB) preserve automation resolution and control mix balance. Clip gain adjusts the signal before any inserts, so your plugins receive a consistent, properly leveled input.
How do I fix a virtual instrument that is too loud?
Reduce the instrument’s master output or place a trim plugin as the first insert and pull the level down by 10–15 dB until the track reads approximately -18 dBFS RMS on an RMS meter.
What happens if I skip makeup gain after a compressor?
Every plugin after the compressor receives a weaker-than-intended signal, producing a thin, lifeless sound. Skipping makeup gain is the most common gain staging error and disrupts the entire processing chain.
Recommended
MASTER MUSIC PRODUCTION
Expert-led courses designed to take you from fundamentals to finished tracks.

HOUSEFrom bouncy bass and solid kicks, this course teaches you the most modern House music production techniques needed to succeed and stand out.

TRAPQuit sounding like generic Trap and produce something World with hints of the Far East. Create ethnic soundscapes to put your Trap ahead of the curve.

AMBIENTProduce relaxing, sophisticated psy-influenced ambient. Psychedelic and relaxing to listen to, create meditative soundscapes to put your listeners in Zen.