

How to Layer Drums Like a Pro
Last Edited: Aug 14, 2026
Drum layering has become one of the most common techniques in modern music production. This technique is especially great for building powerful, controlled kick drums. In many cases, a single sample is not enough to deliver everything needed at once. One kick might have a strong transient but weak low-end, while another could provide rich frequencies without enough attack. This is why professionals often layer drum sounds, with each sample serving a specific purpose. Instead of searching endlessly for one “perfect” kick, it becomes much more effective to combine different elements in a controlled way.
A common approach is separating the kick into three functional layers. The first layer is responsible for the initial punch and transient. The second layer provides the body and tonal character of the kick. The final layer handles the sub-frequencies and low-end foundation. When balanced correctly, these layers work as a single cohesive sound rather than separate stacked samples.
However, layering also introduces one of the biggest problems in low-end processing: phase interaction. Two samples that sound strong individually can become weaker when combined due to phase cancellation. Low frequencies may disappear, transients can lose impact, and the overall kick may start sounding hollow or unstable.
Because of this, successful drum layering is not only about sample selection but also about alignment. Small timing differences between layers can completely change how the final kick behaves. This is especially important in electronic music, where the relationship between the kick and the low-end defines the entire groove of the track.
Listening to the Raw Kick Drum Layer in Context
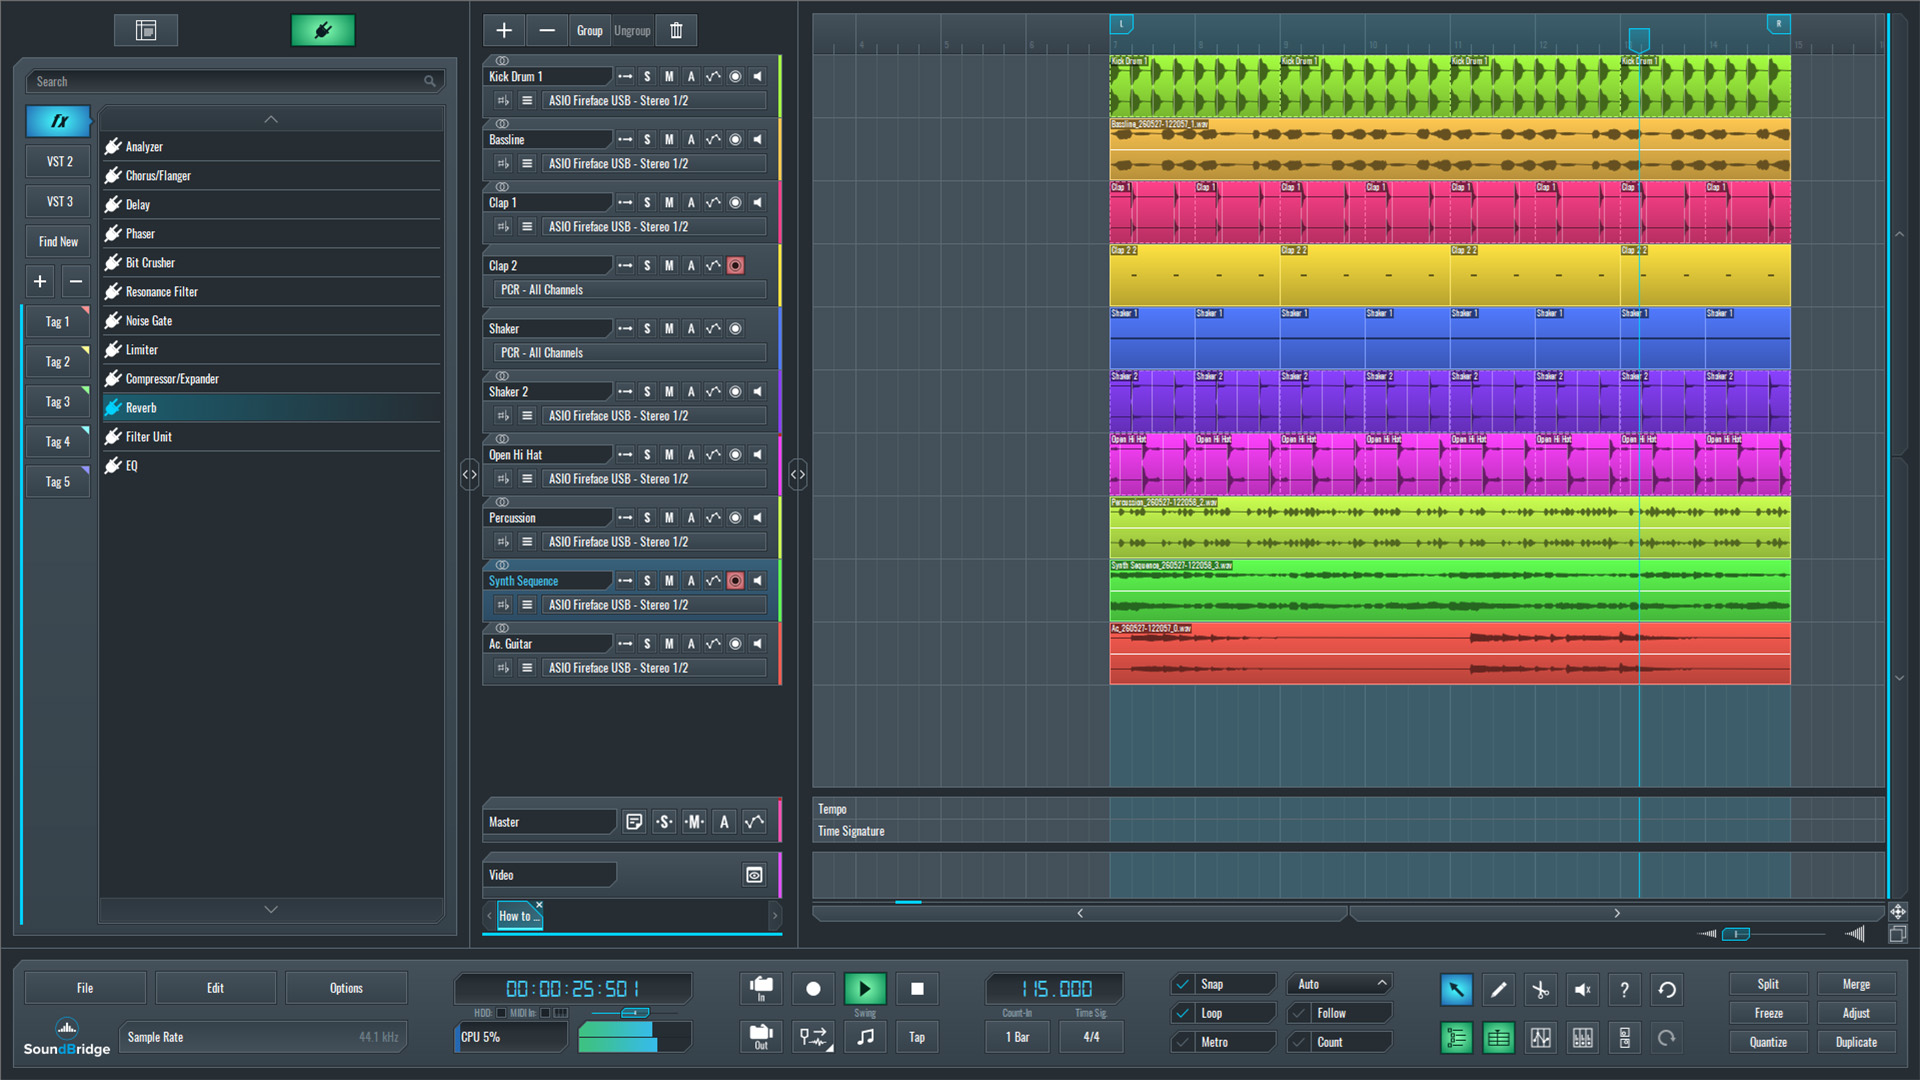
In this tutorial, we begin with a simple loop in SoundBridge: DAW featuring a kick, drums, and a bass. From there, we will rebuild the kick using separate punch, body, and sub layers. The workflow will then focus on aligning these layers and correcting phase issues using MFreeformPhase by MeldaProduction. This plugin is a free alternative to more expensive phase alignment tools.
The goal is not simply to make the kick louder. Rather, we want to create a more controlled, balanced, and mix-ready drum sound that translates consistently across different systems
At the starting point, we created a simple groove using a raw kick sample, basic percussion, and a bassline. The purpose of this loop is not to build a finished arrangement, but to clearly hear how the kick behaves in a realistic mix situation before we introduce any layering.
The kick was first played together with the rest of the loop to evaluate its overall balance. In this case, the sample already contains some useful characteristics, but it lacks consistency across the full frequency spectrum. The transient may cut through well, but the low end feels weaker at times, and the body of the kick doesn't fully lock into the groove.
After listening in context, we then monitored the kick in solo. This makes it easier to identify what the sample is missing and which parts of the sound we should later reinforce with additional layers.
At this stage, we have added no processing yet. The goal is to analyze the kick and understand which role each future layer will need to fulfill, whether that is punch, body, or sub information.
~Full Mix - Kick Drum (Unprocessed)
~Original Kick Drum - Solo (Unprocessed)
Using a Separating Kick Drum Layer for Punch, Body, and Sub
Once we had analyzed the raw kick, the next step was rebuilding it using separate layers, each responsible for a different part of the sound.
We selected the first layer for the punch and transient attack. Its role is to help the kick cut through the mix and remain clearly audible. You can notice that we made this sample super-short because we need just that initial transient to cut through.

~Kick Drum - Punch (Processed With an EQ)
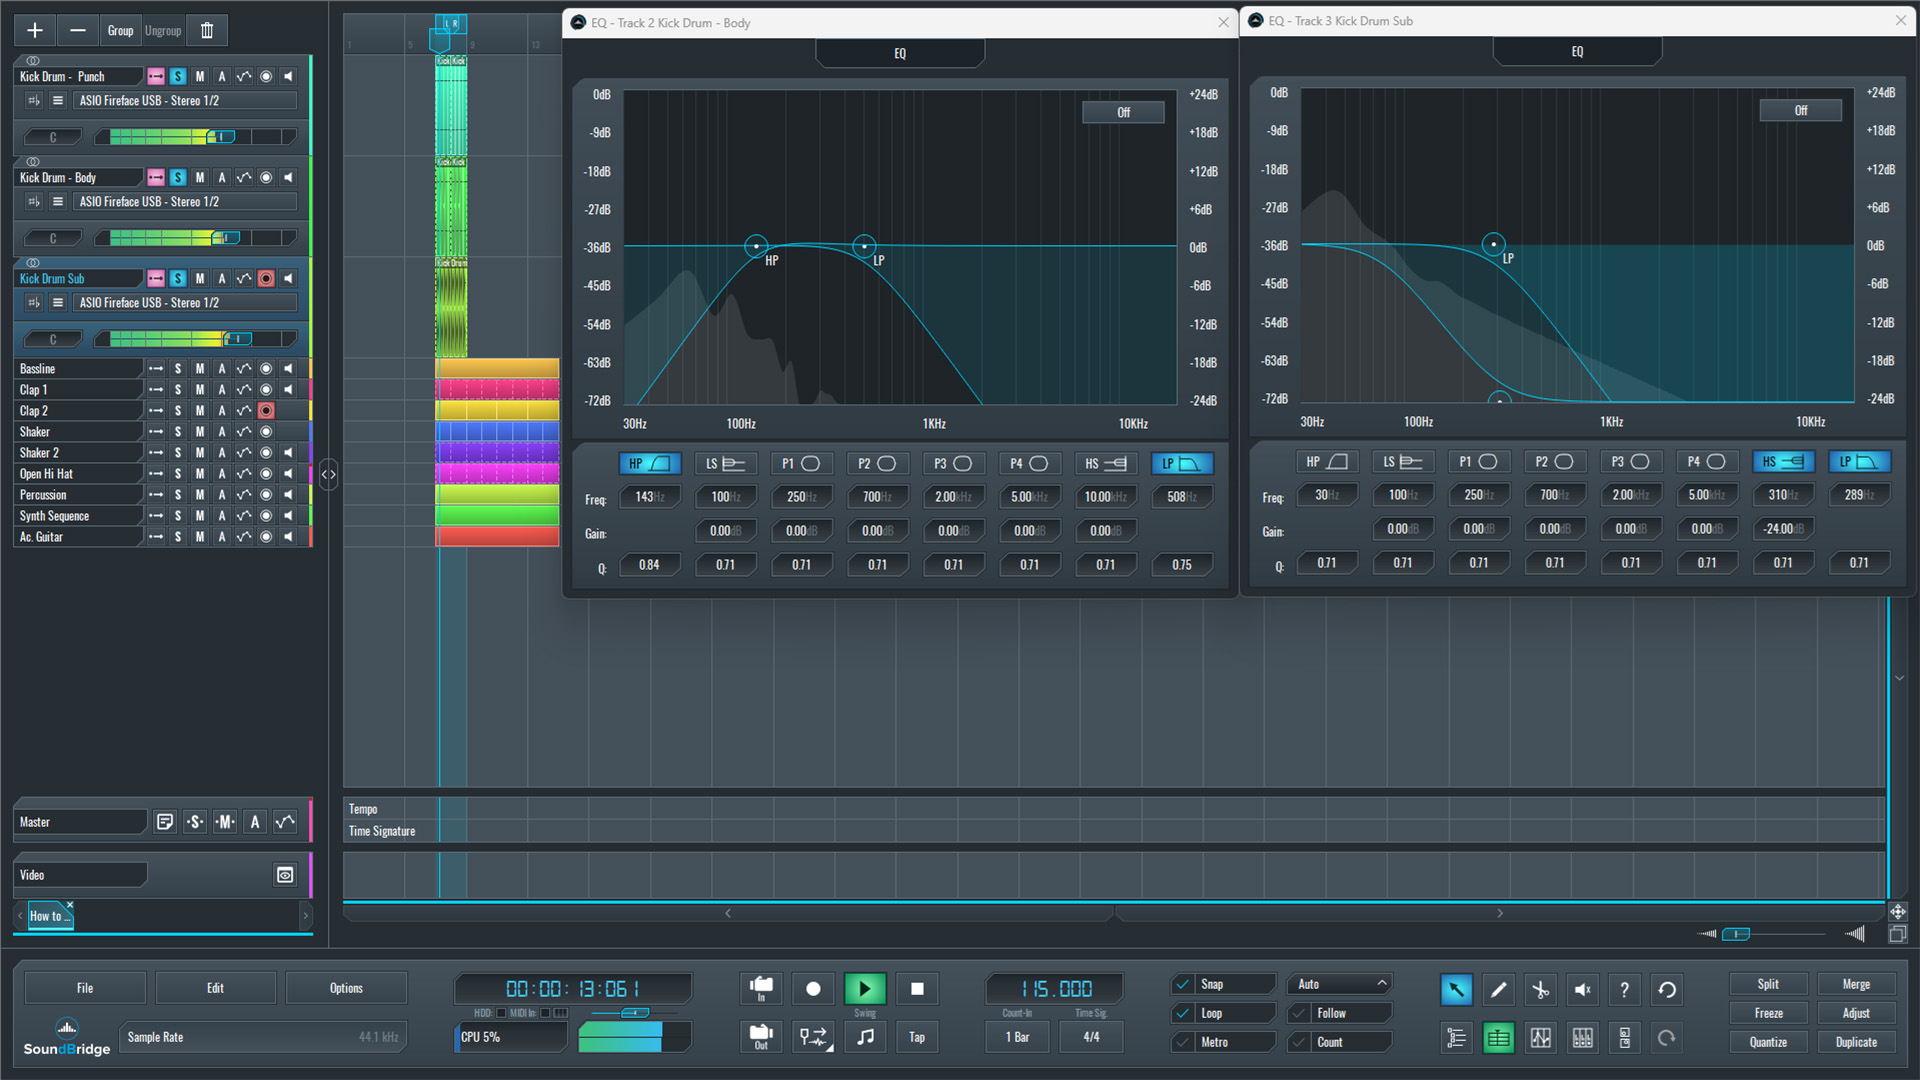
The second layer provides the body of the kick, adding weight and tonal character in the low-mid range. Here, we haven't shortened the sample so much, since we need the body from this layer. We have processed this layer with an EQ, applying low- and high-pass filtering to leave just the low-mid frequencies we need for the body.

Finally, we added a third layer for the sub frequencies, reinforcing the low-end foundation and giving the kick more depth. Naturally, the sample duration for this layer is the longest among the three. We made it longer because we need that tail for the sub-frequencies. Again, we processed this layer with an EQ, applying low-pass and low-shelf filters to leave just the sub frequencies we need for this layer.

At this stage, we have not yet fully aligned or processed the layers. The goal is to separate the kick into functional parts instead of relying on a single sample to handle everything on its own.
~Layered Kick Drum - Solo (Processed With an EQ)
Fixing Phase Issues
Once we combined each drum layer, phase issues immediately became noticeable. Even though each sample sounded strong on its own, certain low frequencies disappeared when played together, and some transients lost impact instead of becoming stronger.
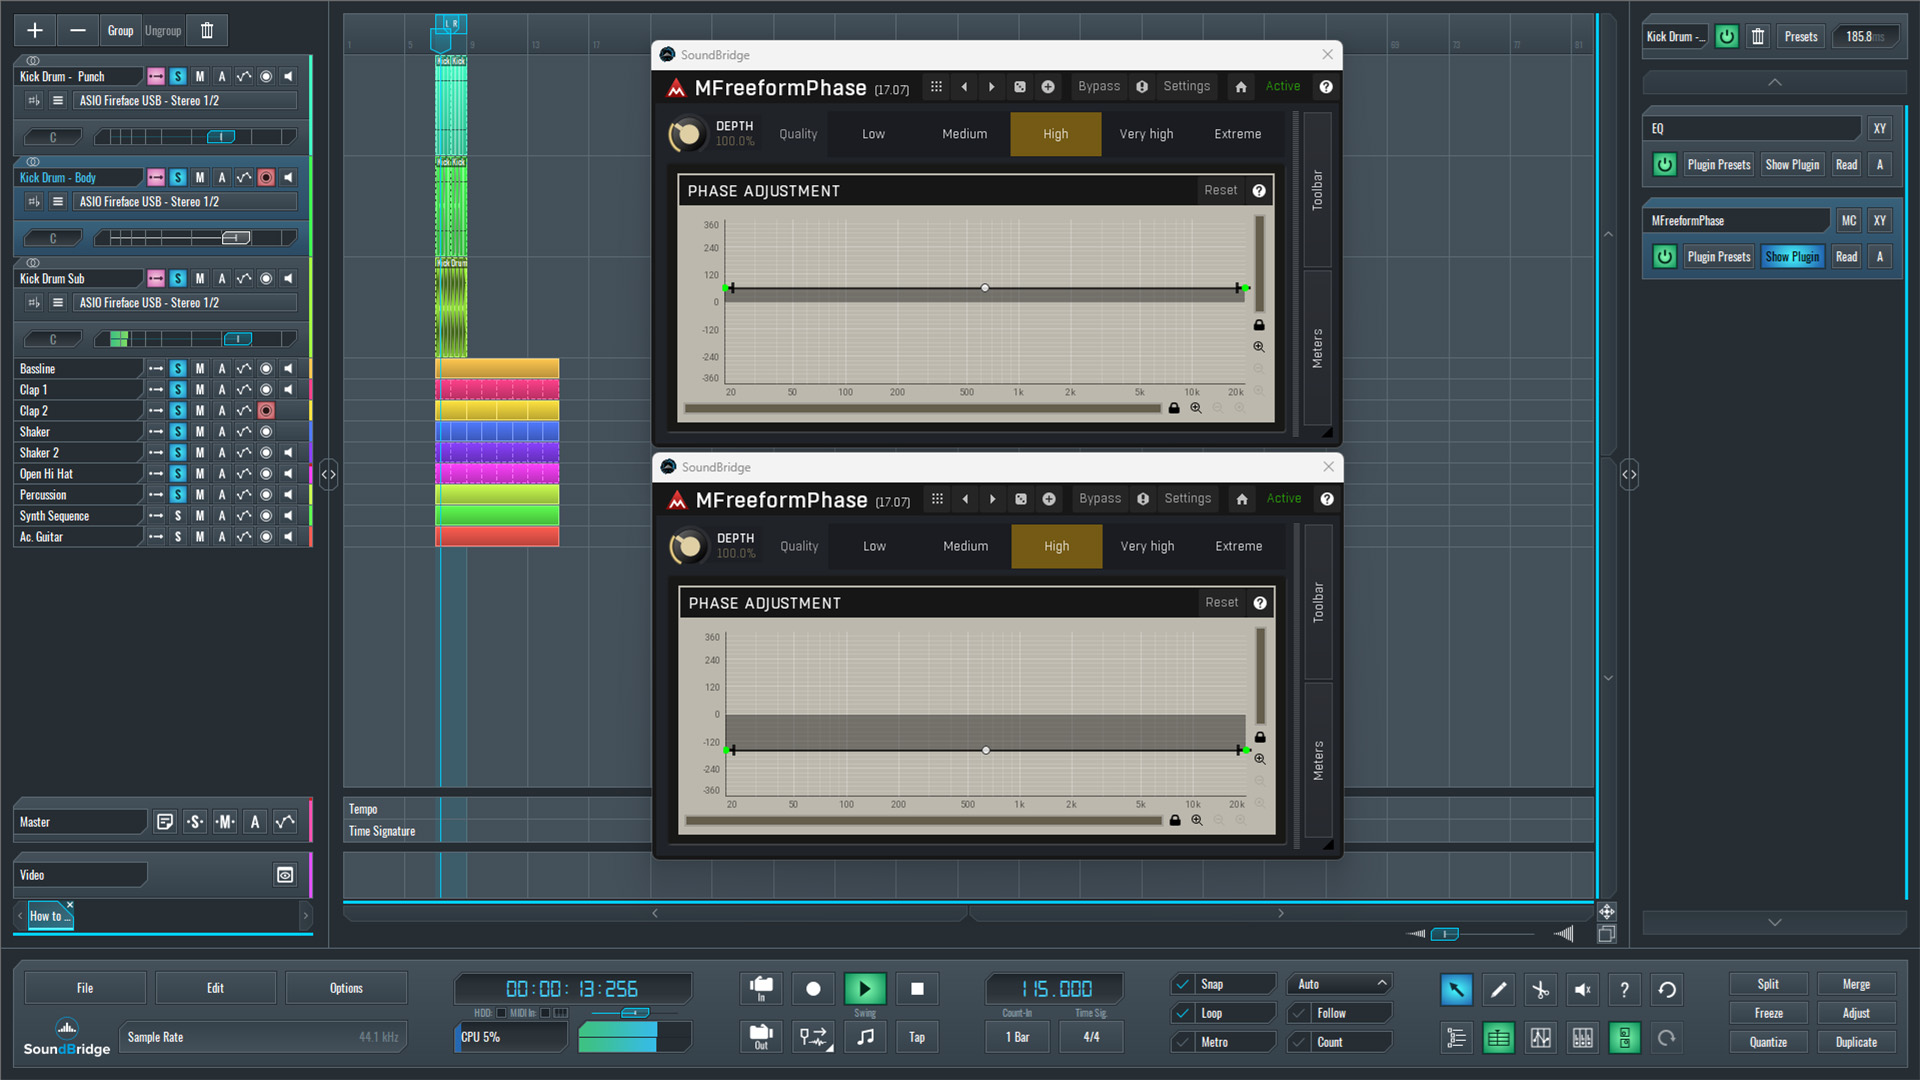
To solve this, MFreeformPhase by MeldaProduction was used on the individual layers. This plugin allows precise phase adjustment, enabling more accurate sample alignment without significantly altering their tone.
The process works by hovering the mouse over the left or right phase point while holding SHIFT. This reveals the exact phase position as a percentage. From there, the phase curve can be moved upward or downward while listening carefully to how the kick responds through the speakers or headphones.
In this case, the body layer of the kick was shifted by around +60% phase, while the sub layer was moved closer to -160%. As shown in the example, this combination produced the strongest and most balanced result for the low end.
This stage is especially important for the sublayer, since low frequencies are highly sensitive to phase differences. Even very small misalignments between samples can weaken the punch and stability of the kick.
After aligning the layers, the kick immediately feels tighter, deeper, and more focused. Instead of fighting each other, the layers now work together as a single cohesive sound.
~Layered Kick Drum - Solo (Processed With an EQ & MFreeFormPhase)
FX Processing
At this stage, we routed each kick drum layer to a single group channel for final processing. Once the layering and phase alignment were complete, the kick sounded significantly stronger and more controlled than the original raw sample. However, a final stage of group processing helps glue the layers together even further, making the kick sound more cohesive rather than like three separate samples stacked together.
A final EQ was applied to the group channel to make small tonal adjustments and clean up the overall balance between the layers. We didn't use this stage for heavy shaping, but more for subtle corrections that help the kick sit better with the bass and the rest of the drums.
After the EQ, a compressor was added to gently glue the layers together. The purpose of this compression is not aggressive dynamic control, but consistency. By slightly controlling the combined signal, the transient, body, and sub begin reacting more naturally as a single unit.
Final Thoughts
Once this processing chain was finished, the kick was played back in the context of the full mix. This is where the real difference becomes obvious. Compared to the original sample, the kick drum layer now feels deeper, tighter, and much more stable across the entire frequency spectrum.
The punch layer helps the kick cut through the groove; the body layer adds character and weight, while the sub layer reinforces the low-end foundation without becoming muddy. Because the phase relationship between the layers was corrected earlier with MFreeformPhase, the low frequencies remain focused rather than collapsing or fighting each other.
One of the most important takeaways from this workflow is that professional drum layering is not simply about making sounds louder. It is about dividing responsibilities between layers and ensuring those layers work together in a controlled manner. Even very strong samples can lose impact if their phase relationships are ignored.
By carefully selecting the layers, aligning their transients, correcting phase issues, and applying subtle group processing, it becomes possible to create a kick that feels powerful, clean, and mix-ready while still translating consistently across different systems.
~Full Mix - Kick Drum (Processed)
If you liked this article, here are some more on the same subject:
MASTER MUSIC PRODUCTION
Expert-led courses designed to take you from fundamentals to finished tracks.

HOUSEFrom bouncy bass and solid kicks, this course teaches you the most modern House music production techniques needed to succeed and stand out.

TRAPQuit sounding like generic Trap and produce something World with hints of the Far East. Create ethnic soundscapes to put your Trap ahead of the curve.

AMBIENTProduce relaxing, sophisticated psy-influenced ambient. Psychedelic and relaxing to listen to, create meditative soundscapes to put your listeners in Zen.