

How to Mix Vocals: Practical Techniques That Work
Last Edited: Jul 2, 2026

Vocal mixing is a structured sequence of audio processing steps designed to deliver clarity, emotional impact, and polished presence in any music production. The standard signal chain runs from gain staging at -18 to -12 dBFS through pitch correction, subtractive EQ, compression, de-essing, additive EQ, saturation, and finally time-based effects on send channels. Skipping or reordering these steps is the single most common reason vocals sound amateur, even with expensive gear. Follow the chain, and you give every other element in your mix a clear emotional anchor to work around.
How to Mix Vocals: What You Need Before You Start
Clean raw tracks are the foundation of every great vocal mix. Before you touch a single plugin, go through your recorded takes and remove mouth clicks, background noise, and unnecessary breath sounds. Leaving these in wastes headroom and forces your compressor to react to sounds that were never meant to be heard.

Session organization matters just as much as the processing itself. Label every track, color-code your vocal layers (lead, doubles, harmonies, ad-libs), and group them into a vocal bus. This setup lets you apply bus-level processing later without creating a tangled mess of individual plugin chains.
Your essential audio editing techniques toolkit for vocal mixing includes:
- EQ: Subtractive and additive shaping (FabFilter Pro-Q 4 is a widely trusted choice)
- Compressors: At least two types, one fast and one slow, for layered dynamic control
- De-esser: Placed after compression and additive EQ (Waves Sibilance is a popular option)
- Saturation plugin: Tube, tape, or transformer emulation for harmonic warmth
- Reverb and delay: Used exclusively on send channels, never inserted directly on the vocal
- Pitch correction: Applied early in the chain before any tonal processing
Pro Tip: Set your gain staging before anything else. Record your vocals so they peak consistently between -18 and -12 dBFS. This headroom gives your compressors and EQs room to work without clipping or distorting the signal.
How Do You Shape Vocal Tone With EQ and Compression?
Tone shaping is the process by which a raw vocal recording becomes something that commands attention in the mix. The process has two phases: subtractive EQ first, then compression, then additive EQ on top.
-
Apply a high-pass filter at 80–120 Hz. This removes low-end rumble, HVAC noise, and mic stand vibration. HPF placement at 80–120 Hz is standard practice across professional vocal chains. Cutting here never hurts the vocal body because the human voice carries no musical content that low.
-
Use subtractive EQ to remove problem frequencies. Around 300 Hz, you often find a boxy, phone-like quality. Near 1 kHz, nasal honkiness appears. The 3–5 kHz range can turn harsh and fatiguing on certain microphones. Use narrow cuts with a high Q to surgically remove these without thinning the overall tone.
-
Apply your first compressor for peak control. A fast-attack compressor in the style of the classic 1176 catches transients before they cause distortion. Aim for a total of 3–6 dB of gain reduction across your compression stage. This range controls dynamics without squashing the life out of the performance.
-
Layer a second compressor for smoothing. A slower, program-dependent compressor in the style of the LA-2A glues the vocal together after the first compressor handles peaks. Layered compression produces a more natural, polished result than a single heavy compressor does.
-
Add presence and air with additive EQ. A gentle boost around 3 kHz adds forward presence. A shelf boost between 8–12 kHz opens up the top end and adds the "air" quality you hear on radio-ready vocals. Keep these boosts subtle, typically 2–3 dB, and always check them in context with the full mix.
Pro Tip: Compression is as much about character as it is about control. A fast compressor colors the tone with punch and aggression. A slow compressor adds warmth and glue. Use both intentionally, not just to tame peaks.
What Is the Role of De-Essing and Saturation in Vocal Mixing?
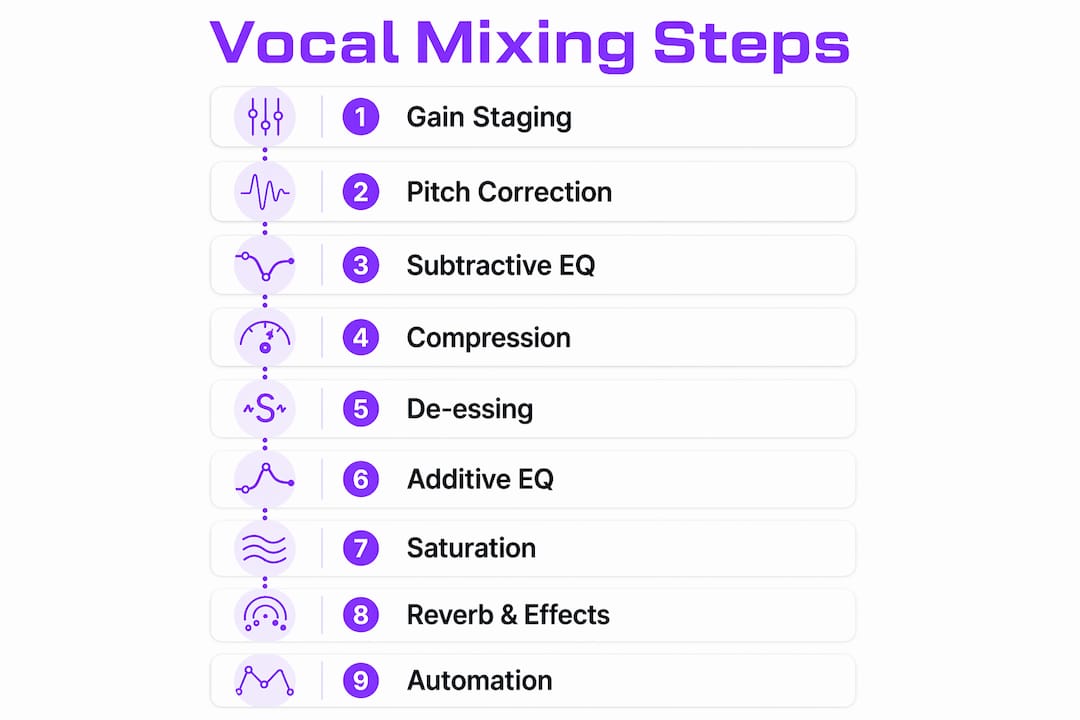
De-essing and saturation are the two most misunderstood steps in the vocal chain. Applied correctly, they add professional polish. Applied carelessly, they destroy the naturalness of a performance.
De-essing must come after compression and additive EQ. The reason is straightforward: compression increases the average level of sibilant sounds, and additive EQ boosts in the presence range can reintroduce harshness. Placing the de-esser after these steps prevents sibilance from sneaking back into the signal.
Key de-essing practices:
- Target the 2.5–5 kHz range where sibilance lives on most vocal recordings
- Use a dynamic EQ instead of a static de-esser when possible. Dynamic EQ only cuts when the signal exceeds a threshold, leaving the rest of the vocal untouched.
- Aim for about 3 dB of reduction on sibilant peaks. More than that, the vocal starts to sound lisping or dull.
- Set the threshold by ear. Solo the de-esser and find the point where "s" and "sh" sounds are controlled without affecting the natural consonant texture.
Saturation works differently. It adds harmonic content, which makes the vocal feel thicker, warmer, and more present without raising the actual level. Transformer saturation adds even-order harmonics and a subtle low-mid weight. Tube saturation brings warmth and a gentle sense of compression. Tape emulation smooths transients and adds a vintage softness.
Pro Tip: Keep saturation subtle on lead vocals. A drive setting that sounds exciting in solo will often feel harsh and noisy in a full mix. Blend the saturated signal in parallel at 20–30% wet to preserve the original tone while adding body.
How Can You Add Depth and Space Without Losing Vocal Clarity?
Time-based effects are where many producers lose clarity in an otherwise solid vocal mix. The rules for reverb and delay are strict, and breaking them costs you intelligibility.
-
Always use reverb and delay on send channels. Reverb on sends gives you independent control over the wet signal without affecting the dry vocal. Inserting reverb directly on the vocal track makes it nearly impossible to adjust the balance later.
-
High-pass filter every reverb return at 200–300 Hz. Reverb tails accumulate low-mid energy fast. HPF on reverb returns removes the muddiness that buries the vocal in the mix without affecting the spatial quality of the effect.
-
Set pre-delay between 15–30 ms on your reverb. Pre-delay creates a gap between the dry vocal and the start of the reverb tail. This gap keeps consonants clear and lets the listener hear the words before the space takes over.
-
Sync your delay to the song tempo. Quarter-note delays fill space rhythmically. Dotted-eighth delays create the classic slapback feel used in pop and country. Tempo-synced delays sit in the groove rather than fight it.
-
Automate your effect sends phrase by phrase. Raise the reverb send during held notes and emotional peaks. Pull it back during fast, lyric-heavy passages where clarity matters most.
| Effect | Setting | Purpose |
|---|---|---|
| Reverb pre-delay | 15–30 ms | Separates dry vocal from reverb tail |
| Reverb return HPF | 200–300 Hz | Removes muddy low-mid buildup |
| Delay type | Tempo-synced | Keeps delay rhythmically locked |
| Saturation blend | 20–30% wet | Adds warmth without harshness |
For backing vocals, effects like chorus and doubling work well because they widen the stereo image without competing with the lead—the lead vocal stays centered and dry by comparison, which makes it cut through naturally. Learning how to make instruments punch through the mix uses the same contrast principle: clarity comes from separation, not from volume.
What Techniques Keep Vocal Levels Consistent and Emotionally Powerful?
Automation is the step that separates a technically correct vocal mix from one that actually moves people. Manual vocal riding following the lyric sheet is more impactful than dynamic compression alone. Compression controls peaks. Automation controls meaning.
The process works like this:
- Print your lyric sheet and follow it in real time. Every line has a natural emotional arc. Some words carry the weight of the song. Others are connective tissue.
- Pull down loud words that compression missed. Plosives and stressed syllables often survive compression and jump out of the mix. A quick 1–2 dB volume dip on the offending word fixes this invisibly.
- Raise quiet passages so every word lands. Verses often sit lower than choruses by nature. Automation lifts the quieter lines so the listener catches every lyric without straining.
- Prioritize emotional payoff lines. The hook, the key lyric, the line the song is built around. These deserve to sit 1–2 dB higher than the surrounding phrases. This concept is called prosody, and it is what makes a vocal feel intentional rather than mechanical.
- Automate effect sends alongside level. When the vocal swells into a chorus, slightly increase the reverb send. When it drops into a quiet verse, pull the send back. This creates a natural sense of space that breathes with the performance.
Pro Tip: Work through automation in passes. First pass: fix the obvious level jumps. Second pass: ride the emotional arc phrase by phrase. Third pass: fine-tune individual words. Trying to do all three at once leads to over-automation and a vocal that sounds edited rather than performed.
The audio editing automation guide from SoundBridge covers efficient automation workflows in depth, including clip gain techniques that dramatically speed up the first pass.
Key Takeaways
Vocal mixing is a structured, ordered process where each step builds on the last, and automation is the final layer that transforms technical correctness into emotional power.
| Point | Details |
|---|---|
| Gain staging first | Set peaks at -18 to -12 dBFS before any processing begins. |
| EQ in two passes | Subtractive EQ removes problems; additive EQ adds presence and air after compression. |
| Layer two compressors | Use a fast compressor for peaks and a slow compressor for smoothing, aiming for a total reduction of 3–6 dB. |
| De-ess after additive EQ | Place the de-esser last in the dynamics chain to prevent sibilance from returning. |
| Automate phrase by phrase | Follow the lyric sheet and ride the levels manually to serve the song's emotional arc. |
What I've Learned From Mixing Vocals the Hard Way
The biggest mistake I see producers make is treating vocal mixing as a technical checklist rather than a creative act. You can hit every gain staging target, apply textbook compression, and still end up with a vocal that feels flat and lifeless. The reason is almost always the same: no automation.
Presets are useful for getting a fast starting point. Tools like iZotope Nectar 4 can speed up initial processing and give you a workable foundation in minutes. But the moment you rely on a preset for your final mix, you hand over the emotional storytelling to an algorithm that has never heard your song.
Manual vocal riding is the defining factor that separates amateur mixes from professional ones, even when both use identical plugins. I have heard this confirmed by engineers working at every level, and I have felt it myself every time I skipped automation and wondered why the vocal felt disconnected from the track.
The other thing worth saying: trust your ears over your eyes. Meters and graphs are guides, not verdicts. If a vocal sounds right at -14 dBFS instead of -18, it is right. The numbers exist to give you a starting point, not a ceiling.
Spend the most time on automation. It is the slowest part of the process and the most rewarding. A vocal that breathes with the song, rises on the emotional lines, and pulls back on the connective ones is what listeners remember long after the track ends.
— Wake
SoundBridge Has the Tools to Put This Into Practice
Mixing vocals well starts with the right environment. SoundBridge is built for musicians and producers who want professional results without having to fight their software to get there.

The SoundBridge platform supports high-fidelity audio processing at up to 192kHz, giving your vocal chain the resolution it needs to capture every nuance of your processing decisions. Whether you are setting up your first gain-staged session or fine-tuning automation on a finished track, the 2026 DAW guide from SoundBridge walks you through choosing and mastering the right digital audio workstation for your workflow. You can also go deeper on creating a unique vocal lead with dedicated tutorials built for vocalists and producers at every level.
FAQ
What is the correct signal chain order for mixing vocals?
The standard vocal chain runs: gain staging, pitch correction, subtractive EQ, compression, de-essing, additive EQ, saturation, then reverb and delay on send channels. Following this order prevents each stage from undoing the work of the previous one.
How do you equalize vocals without making them sound thin?
Use subtractive EQ first to remove problem frequencies, such as boxiness at 300 Hz and harshness at 3–5 kHz, then add presence and air with gentle boosts at 3 kHz and 8–12 kHz after compression. Cutting before boosting preserves the natural body of the voice.
Why should reverb always go on a send channel?
Placing reverb on a send channel keeps the dry vocal signal intact and gives you independent control over the wet level at any point in the mix. Inserting reverb directly on the vocal track makes it nearly impossible to adjust the balance later cleanly.
What does a de-esser actually do?
A de-esser reduces the level of sibilant sounds, the "s," "sh," and "t" consonants, in the 2.5–5 kHz range. It works like a frequency-specific compressor that only activates when harsh high-frequency content crosses a set threshold.
Is automation really more important than compression for vocals?
Automation controls the emotional arc of a vocal performance in a way compression cannot. Phrase-by-phrase automation following the lyric sheet ensures that the words carrying the most emotional weight sit at the right level, which is something no compressor setting can replicate.
Recommended
MASTER MUSIC PRODUCTION
Expert-led courses designed to take you from fundamentals to finished tracks.

HOUSEFrom bouncy bass and solid kicks, this course teaches you the most modern House music production techniques needed to succeed and stand out.

TRAPQuit sounding like generic Trap and produce something World with hints of the Far East. Create ethnic soundscapes to put your Trap ahead of the curve.

AMBIENTProduce relaxing, sophisticated psy-influenced ambient. Psychedelic and relaxing to listen to, create meditative soundscapes to put your listeners in Zen.