

Vocal Processing Chain: Build Pro Vocals in 2026
Last Edited: Jul 14, 2026

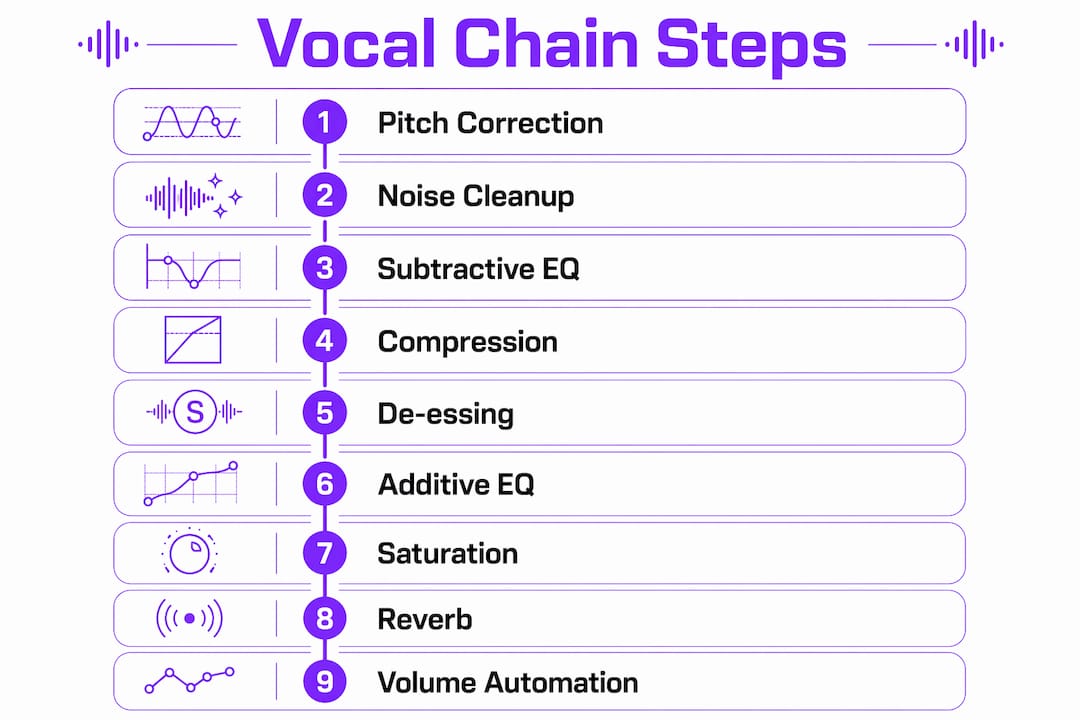
A vocal processing chain is the ordered sequence of effects and plugins applied to a vocal track to achieve clarity, presence, and professional polish in a mix. The order is not arbitrary. Each processor shapes the signal that every subsequent plugin receives, so placing effects in the wrong sequence creates problems that no amount of tweaking can fix. The industry-standard chain runs pitch correction, noise cleanup, subtractive EQ, compression, de-essing, additive EQ, saturation, and then reverb and delay on aux sends, with volume automation as the final step. Master this sequence, and you will hear the difference immediately.
What Is the Standard Vocal Processing Chain?
The standard order exists because each stage cleans or shapes the signal before the next processor acts on it. Starting with a dirty or untuned signal means every downstream plugin works harder and produces worse results.
-
Pitch correction goes first. Tuning algorithms read the raw pitch of the vocal. Any saturation, distortion, or heavy EQ applied before pitch correction confuses the algorithm and produces robotic pitch tracking. Keep the signal clean at this stage.
-
Noise cleanup follows. This means removing breath noise, room rumble, and mic hum before any dynamic processing locks them into the signal. A high-pass filter set around 80–100 Hz removes low-end rumble that has no place in a vocal track.
-
Subtractive EQ comes next. Cut problem frequencies before compression so the compressor responds to the vocal's musical content rather than to resonances or mud. Compression after subtractive EQ avoids pumping from the compressor on unwanted frequencies. This is one of the most misunderstood steps for producers who are new to vocal mixing.
-
Compression controls dynamics. A 4:1 ratio is the standard starting point, with gain reduction targeting 3–6 dB on the loudest peaks. That range tightens the vocal without squashing its natural expression.
-
De-essing treats sibilance after compression. The compressor amplifies the entire signal, including harsh "s" and "sh" sounds. De-essing after compression targets sibilance in its amplified state, which is far more effective. Aim for the 2.5–4.5 kHz band with a reduction of around 3 dB.
-
Additive EQ shapes the tone. Now that the vocal is clean and controlled, you can boost presence, air, or warmth without amplifying problems you should have removed earlier.
-
Saturation adds harmonic character and helps the vocal cut through dense mixes. Place it here, after all corrective processing, so it colors only the polished signal.
-
Reverb and delay go on aux sends, not inserts. This keeps the dry vocal fully controlled while the spatial effects blend in separately.
-
Volume automation is the final step. It smooths out phrase-to-phrase level inconsistencies that compression alone cannot fix.
Pro Tip: Label each plugin in your chain with its purpose, such as "Subtractive EQ" or "De-esser," so you can troubleshoot fast without auditioning every plugin individually.
How Do Variations and Debates Affect Chain Order?

The standard order is a framework, not a law. Professionals adjust it based on the vocal, the genre, and the specific problem they are solving.
The most common debate is EQ before or after compression. Subtractive EQ before compression is standard practice because it feeds the compressor a cleaner signal. Additive EQ after compression shapes the final tone without triggering unwanted dynamic reactions. Some engineers place a second EQ after compression for tonal shaping, which is a valid approach as long as the first EQ handles all corrective cuts.
De-essing placement also generates discussion. Placing the de-esser before compression can work on vocals with extreme sibilance, but the consensus is that de-essing after compression yields more consistent results because you are treating the signal as the listener will actually hear it.
Saturation placement is flexible within limits. Moving saturation earlier in the chain, before additive EQ, can work well when you want the EQ to shape the saturated tone. Never place saturation before pitch correction. Saturation before pitch correction causes tuning algorithms to misread harmonics, resulting in inaccurate pitch tracking.
- Chain bloat is the real enemy of a great vocal sound. The Core vs. Polish framework separates essential processing from optional additions. Core stages include cleanup, compression, and basic EQ. Polish stages include spectral shaping, parallel compression, and exciters. Add Polish only when the Core chain does not solve the problem.
- For a breathy indie vocal, you might skip heavy compression and lean on gentle saturation for presence. For a punchy hip-hop lead, you might stack two compressors, one for peak control and one for density.
- Genre context matters. A pop vocal chain often includes more de-essing and additive high-frequency EQ than a jazz vocal chain, which prioritizes warmth and natural dynamics.
Pro Tip: Bypass your entire chain and listen to the raw vocal. Then re-enable each plugin one at a time. If a plugin does not make an audible improvement, remove it.
What Are Best Practices for Using Sends vs. Inserts?
Reverb and delay belong on aux sends, not on the vocal insert chain. This is professional standard practice, and the reasons are concrete.
When you place reverb on an insert, the wet signal passes through every downstream plugin on that channel. Compression after a wet reverb insert causes the reverb tail to pump in and out unnaturally. Reverb before compression creates exactly this problem, which is why sends exist.
Aux sends give you independent control of the effect level without touching the dry vocal. You can automate the send level separately, share one reverb across multiple tracks to create a cohesive space, and EQ the reverb return without affecting the dry signal.
Key send setup practices:
- High-pass the reverb return at 200–300 Hz. This removes low-end buildup in the reverb tail that muddies the mix. High-passing the reverb return preserves clarity in the low-mids.
- Set reverb pre-delay to 15–30 ms. This gap creates psychoacoustic separation between the dry vocal and the reverb tail. A pre-delay of 15–30 ms preserves intelligibility and keeps the vocal sound upfront.
- Use a separate send for delay. A dedicated delay send lets you sync delay time to the song tempo and automate it independently of the reverb.
- Parallel compression also fits into this routing logic. Send the vocal to a parallel bus, compress it heavily, and blend it back under the dry signal. This adds density without killing transients. For a deeper look at this technique, the guide on parallel compression covers the setup in detail.
| Send type | Recommended setting | Purpose |
|---|---|---|
| Reverb pre-delay | 15–30 ms | Separates dry vocal from reverb tail |
| Reverb return HPF | 200–300 Hz | Removes low-end mud from reverb |
| Delay tempo sync | 1/8 or 1/4 note | Keeps delay rhythmically locked |
| Parallel compression | Heavy ratio, blend to taste | Adds density without losing transients |
For creative send techniques that go beyond standard reverb, the SoundBridge guide on reverb throws shows how to use sends for expressive transitions.
How to Apply Volume Automation Effectively
Volume automation is the final step in the audio processing workflow for vocals, and it solves problems that no plugin can. Compression controls the dynamic range of the vocal, but it cannot account for the natural variation between a quiet verse phrase and a loud chorus phrase. Automation handles that.
Apply automation after your full processing chain is in place. Automating before compression means the compressor will react differently to each level change you draw in, which defeats the purpose of both tools. Volume automation as the last step gives you a stable, processed signal to work with.
Practical automation techniques:
- Work phrase by phrase. Listen to the vocal and identify every line that sits too low or too high in the mix. Draw level adjustments for each phrase rather than a single long automation curve.
- Use clip gain before the chain. Clip gain, available in most DAWs, adjusts the level of individual audio regions before any plugin processes the signal. This levels out extreme peaks before compression even sees them.
- Automate the send level for reverb. Pulling the reverb send down on dense sections keeps the mix clean without removing the effect entirely.
- Keep adjustments subtle. Most phrase-level corrections need no more than 2–3 dB of movement. Larger moves usually signal a recording problem that should have been fixed at the source.
Pro Tip: Use a VCA-style fader automation rather than plugin parameter automation for volume moves. VCA automation is cleaner, easier to edit, and does not introduce plugin latency artifacts.
For a complete breakdown of automation workflows in music production, the SoundBridge audio editing automation guide covers both clip gain and fader automation in depth.
Key Takeaways
A professional vocal processing chain follows a fixed order because each stage shapes the signal that every downstream plugin receives, and breaking that order creates problems no amount of tweaking can resolve.
| Point | Details |
|---|---|
| Order is everything | Pitch correction must come first; saturation and reverb always come last in the insert chain. |
| Compression placement | Apply compression after subtractive EQ to avoid pumping on unwanted frequencies. |
| De-essing timing | Place the de-esser after compression to treat sibilance in its amplified, final state. |
| Sends over inserts | Route reverb and delay to aux sends with a 15–30 ms pre-delay and a high-pass at 200–300 Hz. |
| Automation is last | Apply volume automation after all processing to cleanly smooth phrase-level inconsistencies. |
The Chain Is a Diagnostic Tool, Not a Recipe.
After years of working with vocal chains, the most valuable shift in thinking is treating the chain as a diagnostic sequence rather than a fixed recipe. Every vocal has a different set of problems. Some need heavy pitch correction and almost no compression. Others are dynamically consistent but full of harsh resonances that need surgical EQ cuts.
The biggest mistake I see is producers reaching for character plugins, like exciters and saturators, before they have solved the basic problems. A saturated, excited vocal with a 400 Hz mud buildup sounds worse than a clean vocal with no saturation. Clean first, character last. That principle holds across all genres and vocal types.
The second mistake is chain bloat. Adding plugins because they "might help" is how you end up with 12 processors on a vocal that needed four. Each plugin adds phase shift, potential coloration, and CPU load. The Core vs. Polish framework is genuinely useful here. Build the Core chain, listen critically, and add Polish stages only when you can hear a specific problem the Core chain did not solve.
The third mistake is skipping the listening check at each stage. Bypass each plugin individually and ask whether the vocal sounds better with it engaged. If you cannot hear the difference, the plugin is not earning its place. Trust your ears more than your plugin count.
— Wake
Build Your Vocal Chain Inside SoundBridge
SoundBridge gives you a production environment built for exactly this kind of detailed vocal work. The platform supports high-fidelity audio processing at up to 192kHz, so every stage of your processing chain operates at the resolution professional results require.

The routing architecture in SoundBridge makes send-based reverb and delay setups straightforward, and the bi-directional plugin control lets you adjust hardware and software processors from a single interface. Whether you are building your first vocal chain or refining a complex parallel processing setup, SoundBridge keeps the workflow clear. You can learn more about what the platform offers on the digital audio workstation guide page, or go straight to making your vocals sound unique for technique-focused resources built around the concepts covered here.
FAQ
What is the correct order for a vocal processing chain?
The standard vocal chain order is pitch correction, noise cleanup, subtractive EQ, compression, de-essing, additive EQ, saturation, and then reverb and delay on aux sends, with volume automation applied last.
Why does de-essing go after compression?
Compression amplifies the entire vocal signal, including sibilant consonants. Placing the de-esser after compression means you treat sibilance at the level the listener actually hears, which produces more accurate and consistent reduction.
Should reverb go on an insert or a send?
Reverb belongs on an aux send, not an insert. Sending reverb to a dedicated bus gives you independent wet and dry control, prevents the reverb tail from triggering downstream compressors, and lets you EQ the reverb return separately.
What compression settings work best for vocals?
A 4:1 ratio is the standard starting point, with gain reduction targeting 3–6 dB on the loudest peaks. Adjust attack and release to preserve the vocal's natural transient while controlling dynamic swings.
How do you avoid over-processing vocals?
Use the Core vs. Polish framework: build a chain with only cleanup, compression, and basic EQ first, then add saturation, exciters, or additional compressors only when you can identify a specific problem they solve. If bypassing a plugin makes no audible difference, remove it.
Recommended
MASTER MUSIC PRODUCTION
Expert-led courses designed to take you from fundamentals to finished tracks.

HOUSEFrom bouncy bass and solid kicks, this course teaches you the most modern House music production techniques needed to succeed and stand out.

TRAPQuit sounding like generic Trap and produce something World with hints of the Far East. Create ethnic soundscapes to put your Trap ahead of the curve.

AMBIENTProduce relaxing, sophisticated psy-influenced ambient. Psychedelic and relaxing to listen to, create meditative soundscapes to put your listeners in Zen.