Crafting a Dub Reggae Vibe
Last Edited: Dec 17, 2025
In this article, we will showcase different techniques for transforming a traditional reggae track into dub reggae by adding delays, reverb, and phaser effects. We will use automation to control these effects, creating a deep, trance-like musical atmosphere.
Breif Overview of the Dub Reggae Sound
Dub Reggae music, an evolution of traditional Reggae, is known for its distinctive use of studio effects and remixing techniques. Originating in Jamaica in the late 1960s, Dub involves stripping original tracks down to essential elements, primarily drums and bass, and reshaping them with echo, reverb, and panoramic delay to create an entirely new sound.
This genre emphasizes rhythm and texture over melody, treating the mixing board as an instrument that allows producers to manipulate tracks in real-time. Dub has profoundly influenced various music styles, demonstrating its versatility and enduring appeal across cultural boundaries. The spacious quality within the music invites listeners into a hypnotic experience, where each sound has room to breathe and resonate deeply.
Using Effects in Dub Reggae
Effects, specifically delay and reverb, are essential for Dub Reggae. These effects provide true depth and a floating experience, enhancing the Dub feeling.
We can apply reverb and delay on the send track or as an insert plugin on a channel. The main difference between using these effects lies in their customization: with a send, settings remain mostly unchanged, applying uniformly to all channels using the effect, whereas, with an insert, we can set unique parameters for each channel, resulting in a more distinctive and rich sound.
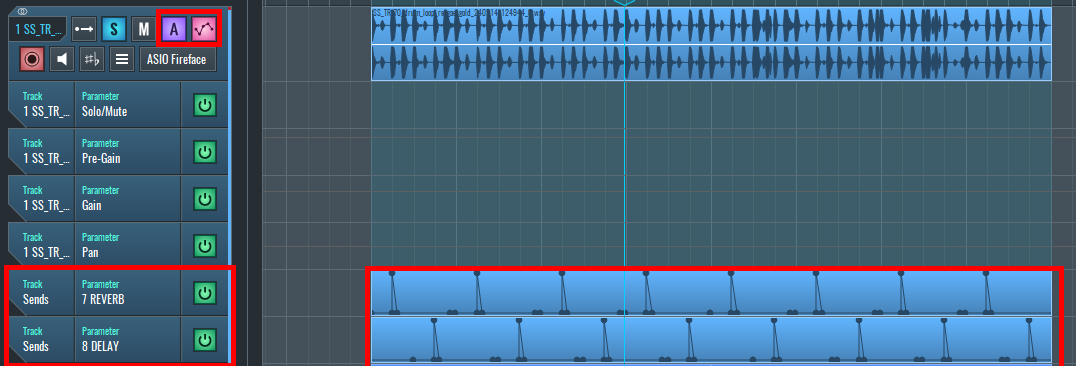
In addition to adjusting parameters, we can use automation to send signals selectively to certain parts of the music. For example, a useful technique is to trigger the effect only when the snare hits, adding variation to the drum beat and making it more interesting. In this scenario, we might send the signal to the reverb return channel on the first snare hit and to the delay channel on the second, creating unique sonic textures with each drum hit.
After adding your drum beat, click on the automation button and create an empty automation block by selecting the Draw Tool and drawing the desired length. Open the automation block and draw automation as demonstrated in the photo below, or arm the track to record the automation by pressing Record.
To apply this technique across different effects, copy and paste the first block to the second effect, sending the signal to the delay channel. Double-click on the automation block and move the effect to the second snare hit.
~Drum Beat - Solo (Unprocessed)
~Drum Beat - Solo (Processed with Delay and Reverb)
Let's Add Automated Effects to the Guitars
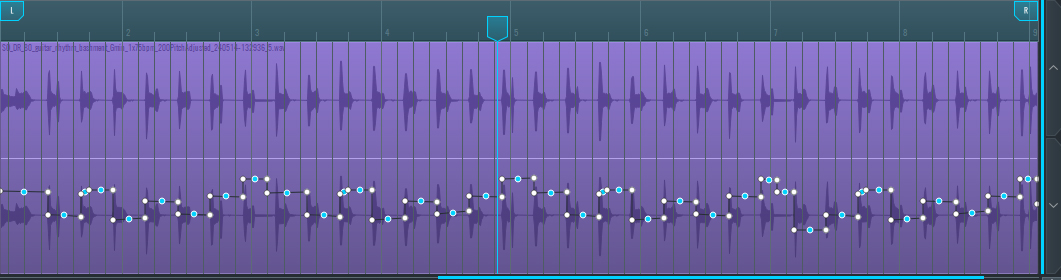
In a practical example, we automated delay time settings for the guitar channel so that each guitar hit had a different delay time. We followed the same method as described earlier.
Click the "A" button to open automation. Press "Read" mode. Adjust the delay time to load it into the automation list. Use the Draw tool to create an automation block, or press Record to record it.

~Guitar - Solo (Unprocessed)
~Guitar - Solo (Processed with Delay)
Adding Effects to Vocal Tracks
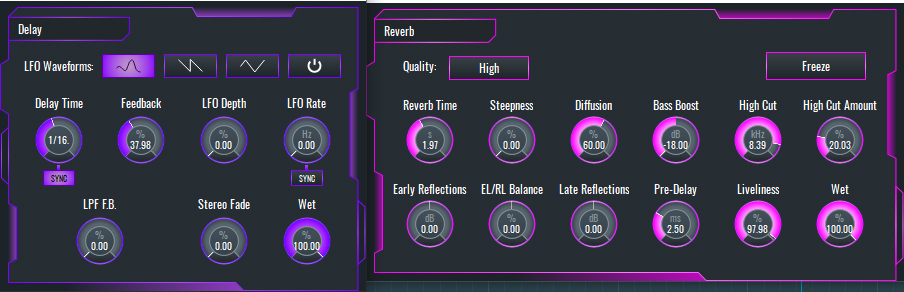
For other tracks like trumpet and vocal, we send around 20% to delay and 50% to reverb to add depth and create the characteristic floaty liquid effect synonymous with Dub Reggae Music.
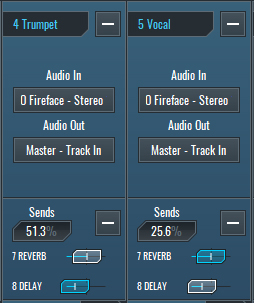
Ensure that parameters are set for reverb and delay on the return channels, as depicted in the image below. It's crucial to set the Wet parameter to 100%.
Listen attentively to appreciate the differences that reverb and delay create in the music.
Now let's listen to the end result and compare the Dub Reggae track with and without effects.
~Dub Reggae Track (Unprocessed)
~Dub Reggae Track (Processed with Delay and Reverb)
If you liked this article on sound design, here are some more on the same subject:
- Add Depth to Your Instruments Using a Delay Effect
- Make Your Drums Sound Warmer
- Color Your Track With a Lo-Fi Sound
- Exploring Drum and Bass Techniques with RitMix in SoundBridge
DOMINA PRODUCCIÓN
Cursos con expertos para llevarte de fundamentos a tracks terminados.

HOUSECon bajos rebotones y kicks sólidos, este curso enseña técnicas modernas de producción House para destacar y triunfar.

TRAPDeja de sonar a Trap genérico y produce algo World con toques de Oriente. Crea paisajes étnicos para poner tu Trap por delante.

AMBIENTProduce ambient relajante y sofisticado con influencia psy. Psicodélico y relajante de escuchar; crea paisajes meditativos para llevar a tu público a Zen.