How to Layer Kick Drums for Maximum Punch
Last Edited: May 1, 2026
In this guide, we will break down how to diagnose a weak punch region, layer kick drums for maximum punch, shape them with EQ and saturation, align them properly in phase, and blend them into the mix without creating conflict.
The kick drum is the structural anchor of most electronic productions. It defines weight, groove, and perceived energy. When the kick lacks presence, the entire track feels weaker, no matter how strong the bassline, percussion, or melodic elements are.
One of the most common problems in modern house and techno-oriented genres is a kick that has sufficient sub-energy but lacks punch in the low-mid frequency range, particularly around 150–200 Hz. This range is responsible for physical impact and translation on smaller systems. Without it, the kick may feel deep but not powerful.
Many producers attempt to fix this by boosting EQ on the original kick. In practice, that often amplifies mud rather than adding real impact. When the required energy is not present in the source, boosting only exaggerates weaknesses.
A more controlled and professional solution is layering. By introducing a secondary kick component designed specifically to reinforce the missing frequency band, you can increase punch without compromising clarity or low-end stability. The key is not stacking volume, but assigning frequency roles with precision.
Step 1: Listening in Context Before Processing
Before making any technical decisions, we start by listening. The first reference point is a short groove pattern built in the main drum section. This pattern includes the kick together with basic percussive elements, so we can evaluate how it behaves in a realistic musical context.
Listening in context immediately reveals whether the kick drum feels solid within the groove or if we might need to layer it. At this stage, we are not focusing on fine EQ moves or layering. We are assessing overall weight, punch, and how the kick interacts with surrounding elements. Does it cut through or feel hollow? Does it translate energy, or does it feel soft and distant?
After evaluating the pattern, we isolate the kick and listen to it solo. This second step removes distraction and allows us to focus purely on its tonal balance and transient structure. In solo, weaknesses become more obvious, especially in the 150–200 Hz range where punch lives.
By comparing the kick in context and in isolation, we establish a clear diagnosis. This diagnosis prevents random processing and ensures that any layering or corrective steps that follow are based on deliberate listening rather than assumption.

~Full Mix - Kick Drum (Unprocessed).
~Kick Drum - Solo (Unprocessed).
Step 2: Confirming the Missing Punch With Spectrum Analysis
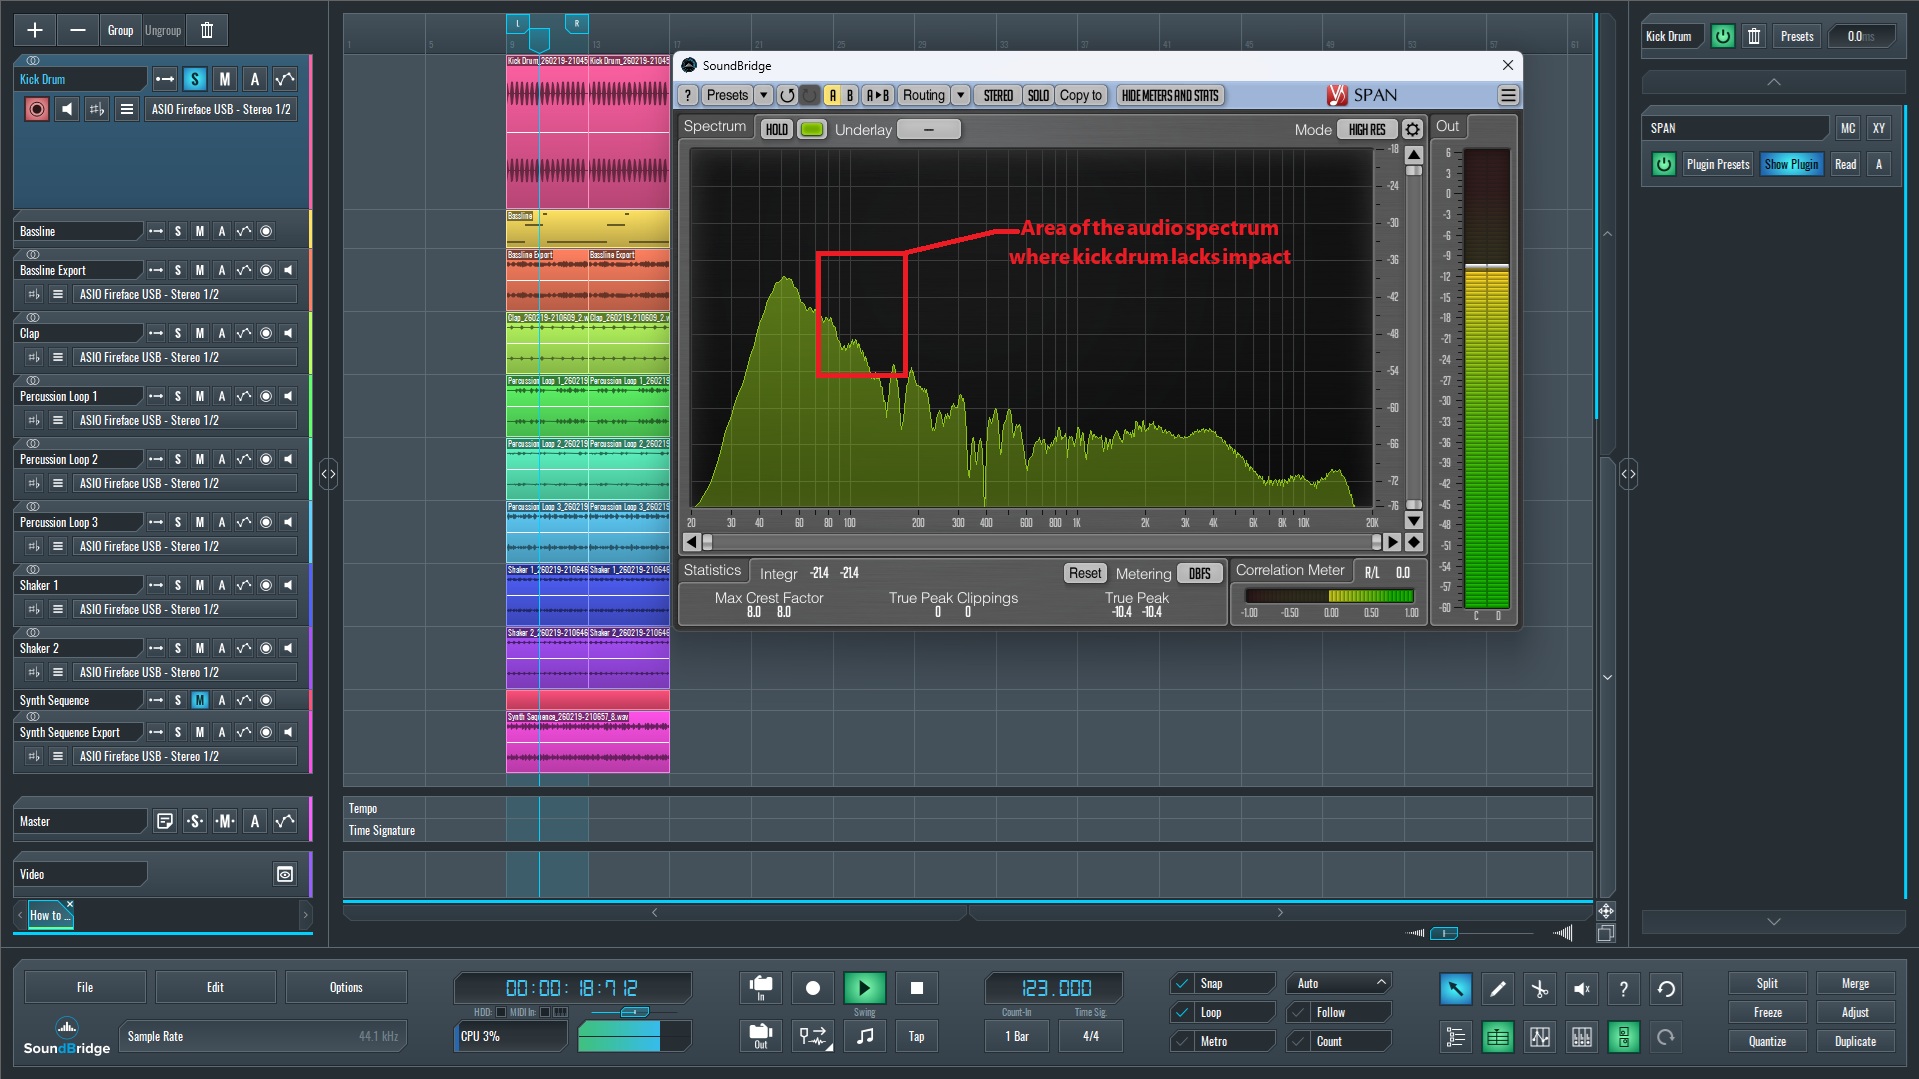
After the initial listening stage, we move to visual confirmation. While trained ears can identify a lack of impact, a spectrum analyzer allows us to verify exactly where the deficiency exists.
In this case, we insert Voxengo SPAN on the kick channel and observe the frequency distribution while the kick plays. We are not looking at the sub-region first. Instead, attention is directed to the low-mid frequency range between 130 and 170 Hz.
In this scenario, a strong peak in the sub-region (around 50–80 Hz) is typically followed by a noticeable dip or reduced energy in the 130–170 Hz band. This observation confirms why the kick may feel deep but lacks physical punch. The harmonic content necessary to achieve impact on medium- and small-sized playback systems is insufficient.
The analyzer does not replace listening, but it removes ambiguity. Once we visually confirm that the low-mid punch zone is underrepresented, the next logical step is not boosting EQ on the original kick. Instead, we proceed to controlled layering, introducing a secondary kick component specifically designed to reinforce the 130–170 Hz range without disturbing the existing sub foundation.
Step 3: Selecting the Right Kick Drums to Layer
With the issue identified, we select a complementary kick sample, not to replace the original, but to reinforce the missing 130–170 Hz range. The goal is functional reinforcement, not tonal duplication. This second layer must serve a specific spectral purpose.
A Roland TR-909–style kick is often ideal. It is known for a strong low-mid punch, short decay, controlled sub, and a firm transient. Its tonal balance naturally emphasizes the area where many modern, sub-heavy kicks feel hollow. Because of this focused energy profile, it integrates well when used strictly as a punch layer rather than a full-range replacement.
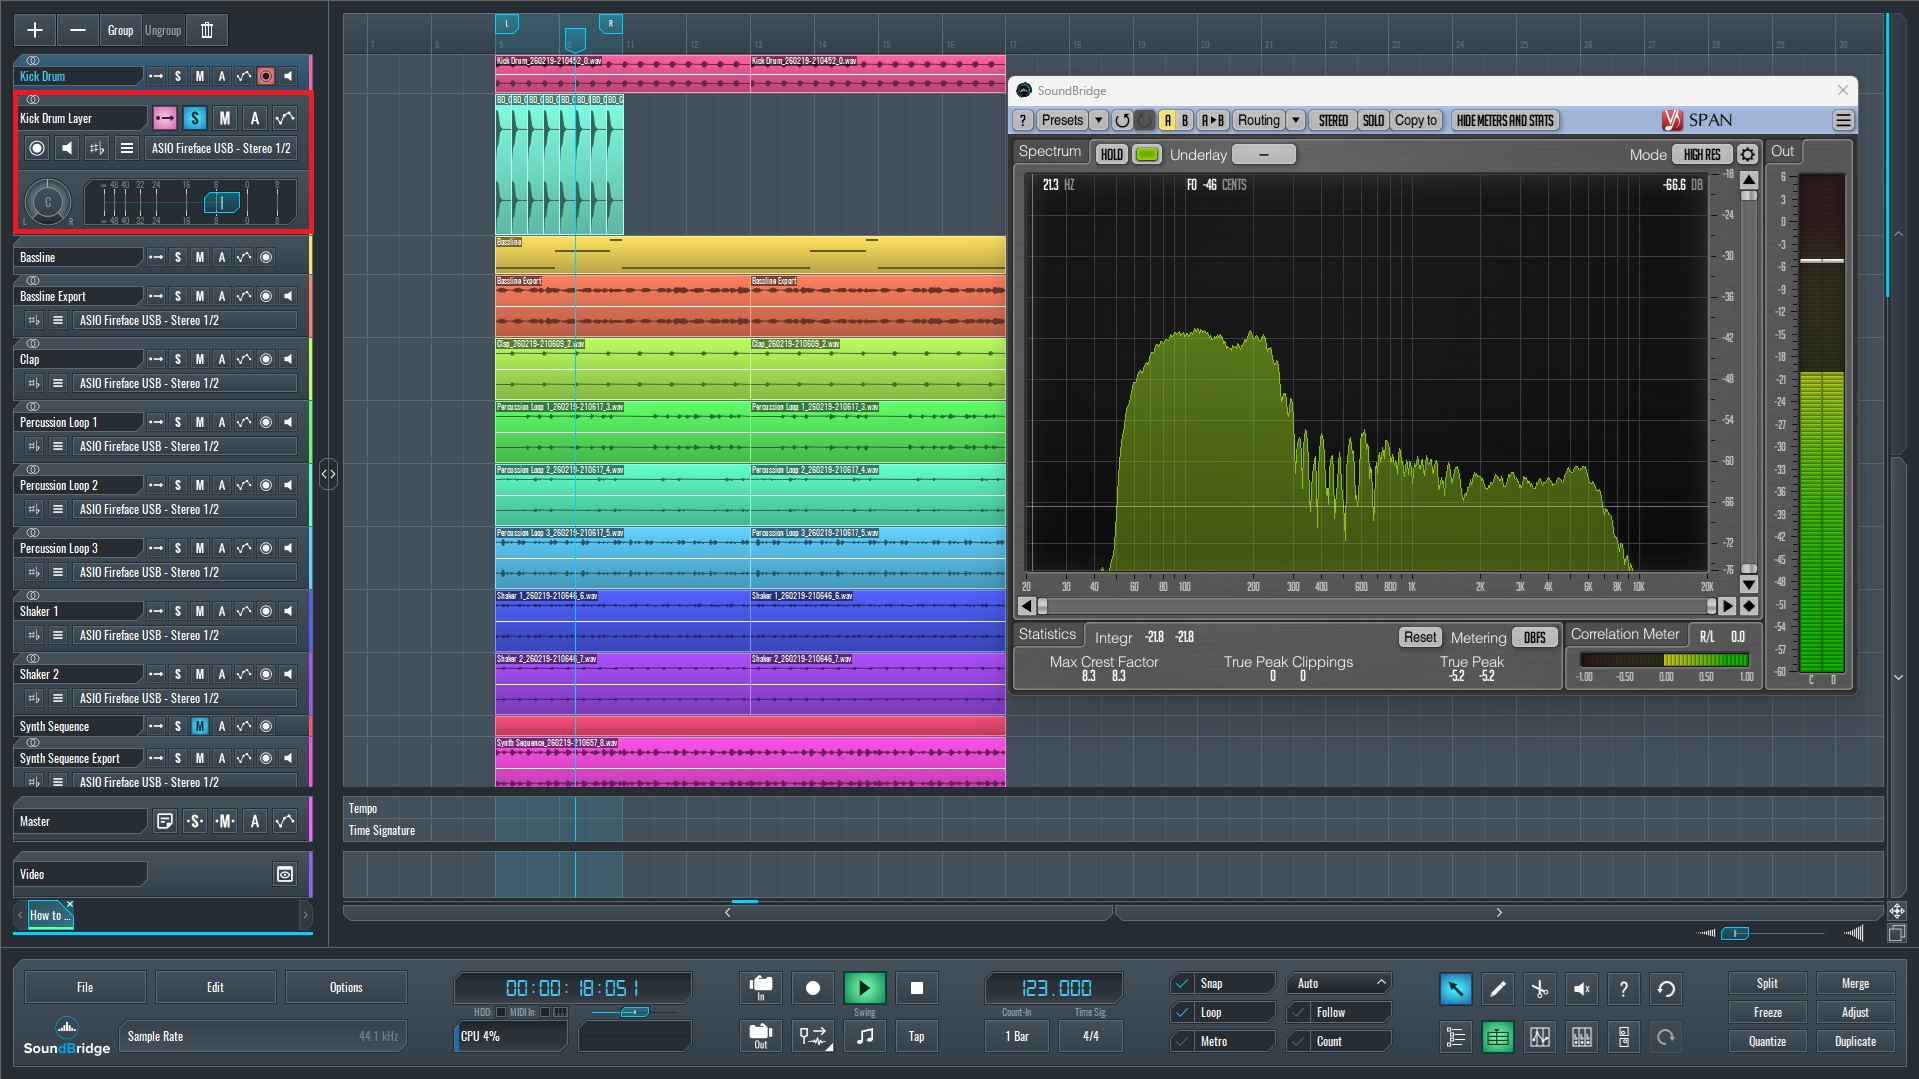
We keep the sample completely unprocessed at first. Listening in solo allows us to evaluate its decay length, transient sharpness, and mid-body density without influence from other elements. We pay close attention to how quickly it drops off and whether it carries excessive sub or top-end information.
Next, we insert Voxengo SPAN on the new kick channel and observe its frequency distribution. We specifically look for a visible energy concentration between 130 and 170 Hz, ideally stronger than in the original kick. This visual confirmation aligns with what we hear and ensures we select a sample that naturally fills the identified gap.
Once verified, we move forward to precise alignment and controlled shaping.
~Kick Drum Layer - Solo (Unprocessed).
Step 4: Processing and Blending the Kick Drum Layer
Now we process the selected kick layer while listening in context with the original kick.
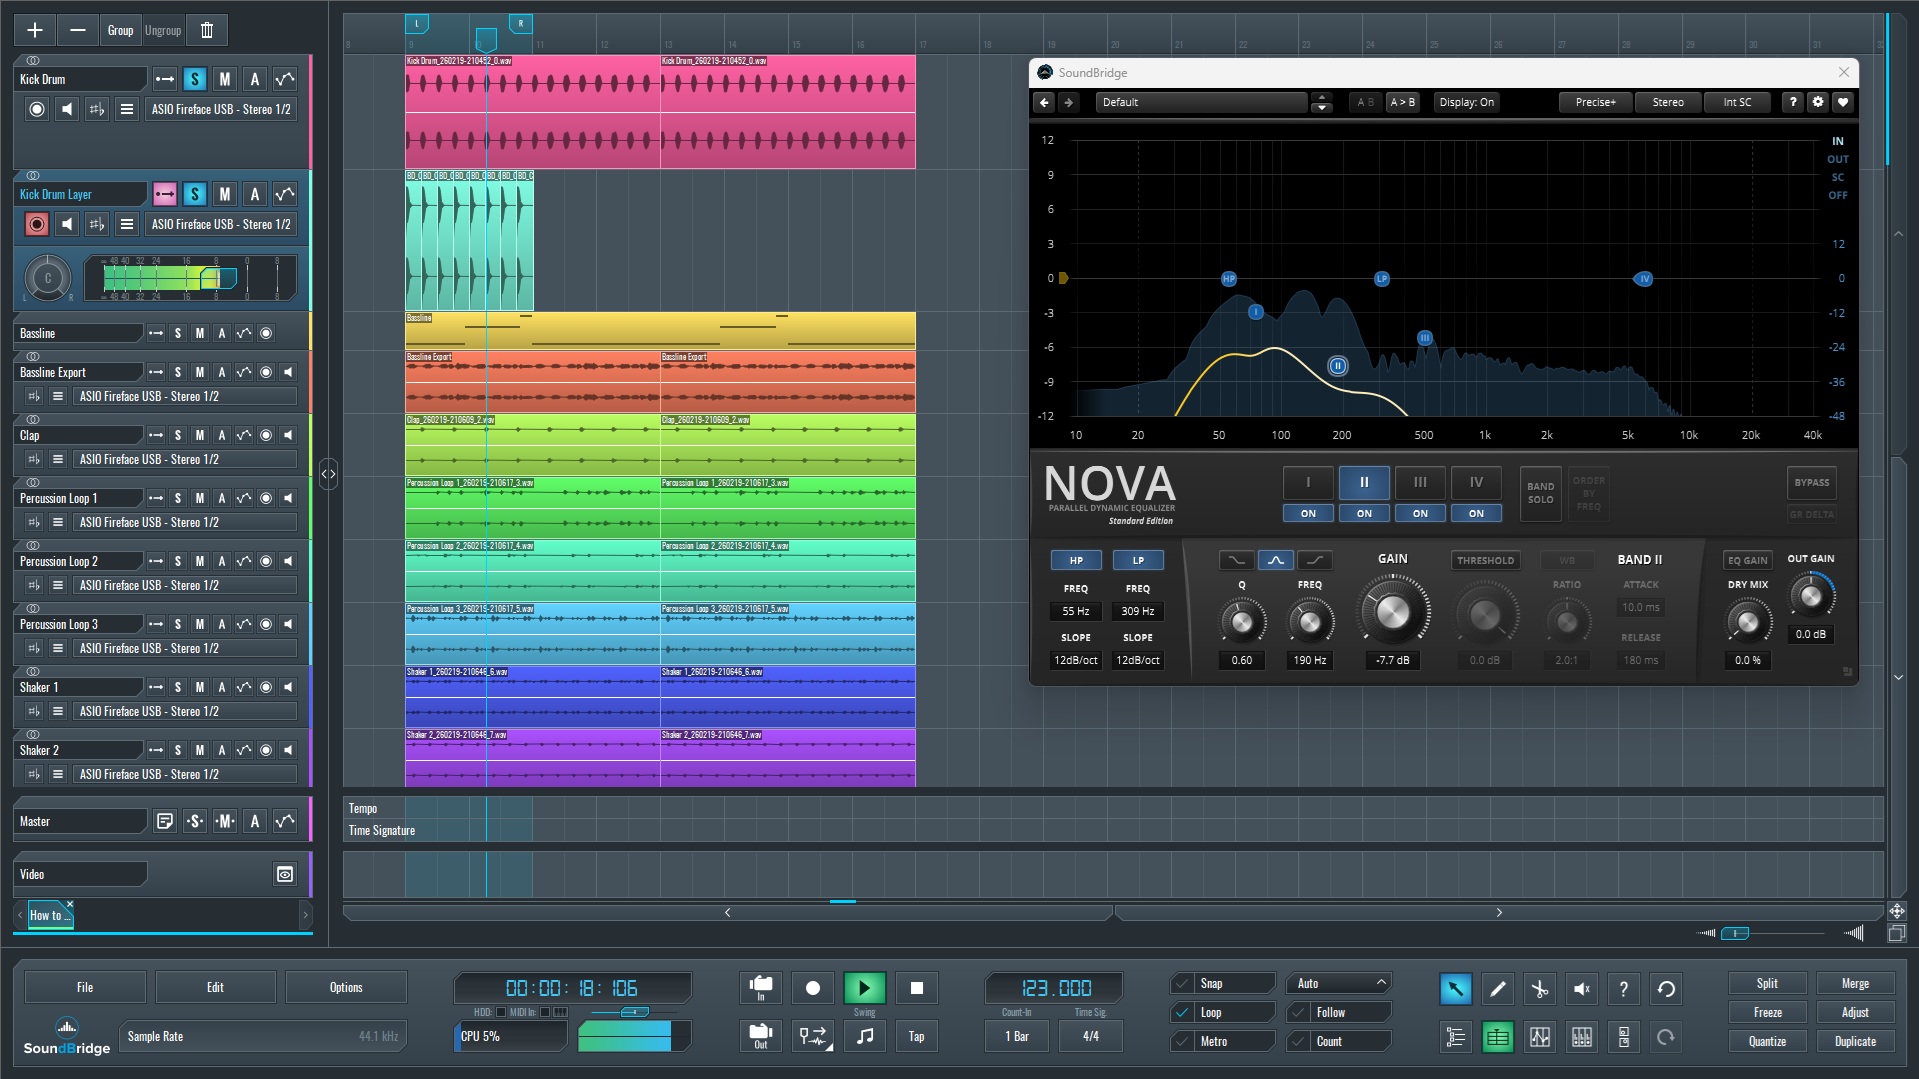
We insert TDR Nova and use only filters. First, a high-pass filter at 12 dB/octave removes most low frequencies, especially the sub. The original kick already handles that range.
Then we apply a low-pass filter, also at 12 dB per octave, cutting unnecessary highs and transient clicks.
After filtering, the layer contains mainly the punch zone around 130–170 Hz. It now serves a single purpose: to reinforce impact.
Next comes volume blending. We lower the layered kick completely, then slowly bring it up under the original kick.
The goal is not to hear two kicks, but to feel more punch. If it sounds like a second kick, it is too loud.
~Kick Drum Layer - Solo (Processed with EQ).
~Kick Drum Mix - Kick Drum Layer (Processed With EQ).
Step 5: Enhancing the Kick Drum Layers' Punch With Saturation
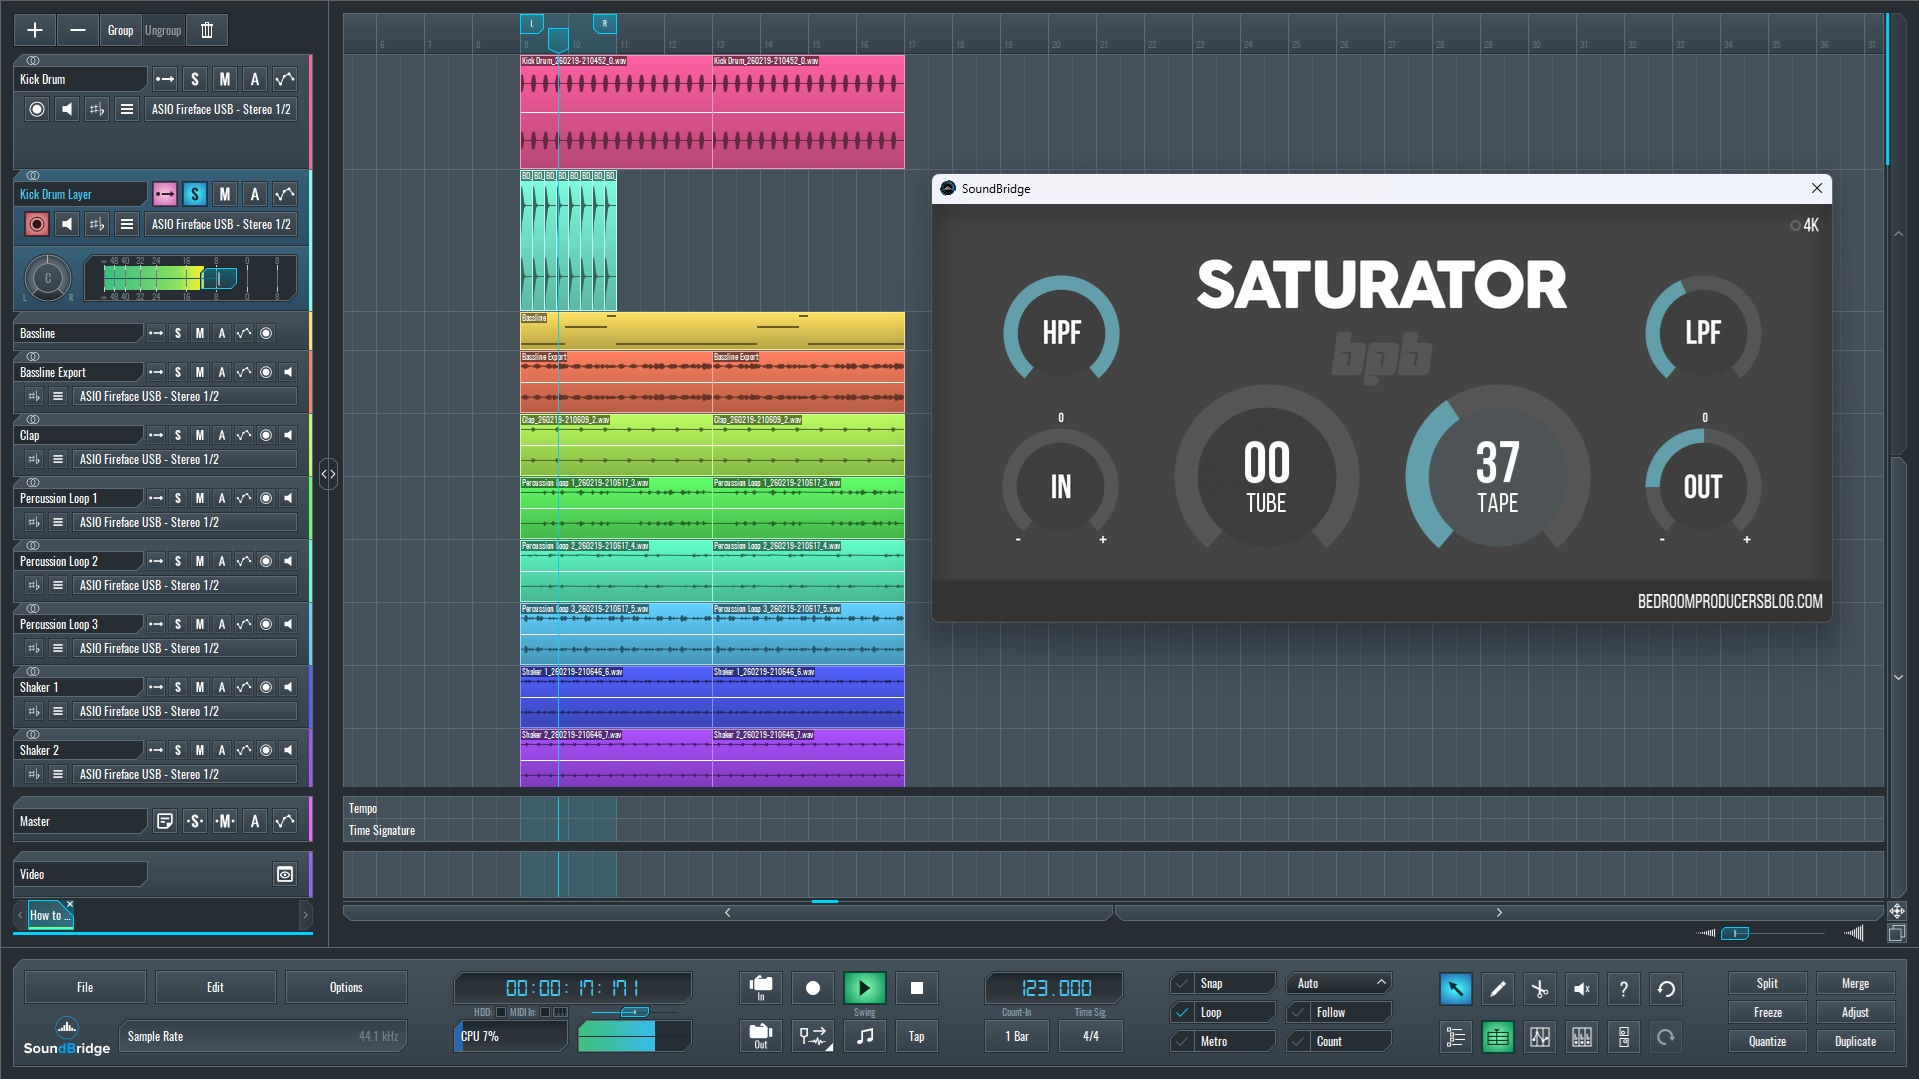
To further increase perceived punch, we can introduce controlled saturation on the kick layer.
In this case, we use BPB Saturator and select the tape saturation mode. Tape-style saturation adds harmonic density, making the 130–170 Hz region feel fuller and more present without simply increasing volume.
After applying saturation, we refine the signal inside the plugin. We further tighten the high-pass filter to ensure no unwanted low-end reappears, and use the low-pass filter to keep the layer focused and controlled in the midrange.
Finally, we reduce the plugin's output level to compensate for any gain increase due to saturation. The goal is impact, not loudness.
~Kick Drum Layer - Solo (Processed with EQ+Saturation).
~Kick Drum Mix - Kick Drum Layer (Processed With EQ+Tape Saturation).
Listening to the Final Kick Drums in Context
At this stage, we return to the full mix. The kick drums we layered are no longer evaluated in isolation but as part of the complete arrangement, alongside bassline, percussion, melodic elements, and the overall groove.
We play the entire section and focus on impact, not volume. The objective is to feel a stronger sense of punch without the mix becoming heavier or muddy. The low end should remain tight and controlled, while the kick translates more clearly across different playback systems.
It is important to compare the processed version with the original. Bypass the layered channel and saturation briefly, then reactivate it. The difference should not sound like an added element, but like an improvement in density and physical presence. If the kick suddenly feels thinner when bypassed, the layering is working correctly. If the mix feels cleaner and more defined with the processing engaged, the balance is appropriate.
At this point, check mono compatibility and overall phase coherence. A strong layered kick should remain solid in mono without losing punch. Also, monitor how the kick interacts with the bassline. If masking occurs in the 130–170 Hz range, minor adjustments in EQ or level may be required.
Final Thoughts
Finally, listen at multiple volume levels. At lower listening levels, the added punch should help the kick remain perceptible. At higher levels, it should feel powerful but controlled, never overwhelming.
Effective kick layering is not about stacking sounds. It is about designing frequency roles with precision and maintaining clarity under real mixing conditions. When executed correctly, the result is a kick that feels deeper, tighter, and more impactful—without sacrificing balance or headroom.
~Full Mix - Kick Drum (Processed).
If you like this article, here are some more on the same subject:
MASTER MUSIC PRODUCTION
Expert-led courses designed to take you from fundamentals to finished tracks.

HOUSEFrom bouncy bass and solid kicks, this course teaches you the most modern House music production techniques needed to succeed and stand out.

TRAPQuit sounding like generic Trap and produce something World with hints of the Far East. Create ethnic soundscapes to put your Trap ahead of the curve.

AMBIENTProduce relaxing, sophisticated psy-influenced ambient. Psychedelic and relaxing to listen to, create meditative soundscapes to put your listeners in Zen.