
How to Run Your Own TURN Server for SoundBridge
Last Edited: Mar 16, 2026
Complete 2026 Guide: Linux + CoTURN + SSL + Username/Password Authentication
If you own a SoundBridge Lifetime License, you can run your own TURN server (Traversal Using Relays around NAT) for maximum reliability, privacy, and low-latency audio performance.
This guide walks you through the complete process of setting up a WebRTC relay on your own infrastructure:
-
Renting a Linux cloud server
-
Purchasing a domain name for SSL
-
Creating an SSH key and connecting securely
-
Linking the domain to your server (DNS A Records)
-
Configuring the Hetzner firewall
-
Installing CoTURN on Ubuntu 22.04
-
Enabling SSL with Let’s Encrypt (Certbot auto-renew)
-
Securing the server with username/password authentication
-
Entering the correct endpoints in SoundBridge
Why Run Your Own TURN Server?
In remote audio collaboration, TURN servers relay audio data when direct peer-to-peer (P2P) connections fail due to:
-
Symmetric NAT restrictions (common in home routers)
-
Restrictive firewalls
-
Corporate networks or educational Wi-Fi
-
Strict ISP routing
Running your own server provides:
-
Lower Latency: Optimized routing for real-time audio.
-
Full Control: Complete oversight of your networking infrastructure.
-
No Shared Relays: No congestion from other users on public servers.
-
Unlimited Sessions: Scale as much as your hardware allows.
-
Better Privacy: Your audio metadata stays on your own hardware.
Step 1 — Rent a Server and Buy a Domain
You will need two things to start:
-
A Linux cloud server
-
A domain name
Rent a Linux Server
TURN servers require very little CPU power, so even inexpensive instances work well for high-quality audio relay.
Recommended Minimum Specs:
-
OS: Ubuntu 22.04 LTS
-
vCPU: 2 Cores
-
RAM: 4 GB
-
Storage: 20+ GB SSD
-
Network: Public IPv4 address
Recommended Provider: Hetzner Cloud
-
Recommended instance: CX23 (4GB RAM)
-
(As of 03.04.26, model numbers may slightly change)
Buy a Domain Name
You will need a domain name to generate a trusted SSL certificate for secure WebRTC signaling.
-
Providers: GoDaddy, Namecheap, Cloudflare, Porkbun, or Hover.
-
Example used in this guide:
turn.example.com
Step 2 — Create an SSH Key for Secure Access
Your server provider will ask you to add an SSH public key when creating the server. This is a secure "digital key" that replaces a password.
To generate your secure access credentials, open your computer's terminal application—Terminal on macOS, or Command Prompt/PowerShell on Windows—and run the following command:
ssh-keygen -t ed25519Press Enter to accept the default location.
Locate Your Public Key
To view your public key, run the command cat ~/.ssh/id_ed25519.pub in your terminal. This will display the key directly on your screen so you can copy it.
If you prefer to open the file in a text editor to copy it, you can find the file at these specific locations:
-
macOS: Open Finder, press
Command + Shift + G, and paste the path~/.ssh/id_ed25519.pubto navigate directly to the file. -
Windows: Open File Explorer and paste the path
%USERPROFILE%\.ssh\id_ed25519.pubinto the address bar.
Copy the entire line (it starts with ssh-ed25519) and paste it into your server provider’s console when creating the server.
Step 3 — Create the Server
In your cloud provider dashboard (Hetzner), create the server with:
-
Image: Ubuntu 22.04
-
Type: CX23 instance
-
SSH Key: Select the key you just uploaded.
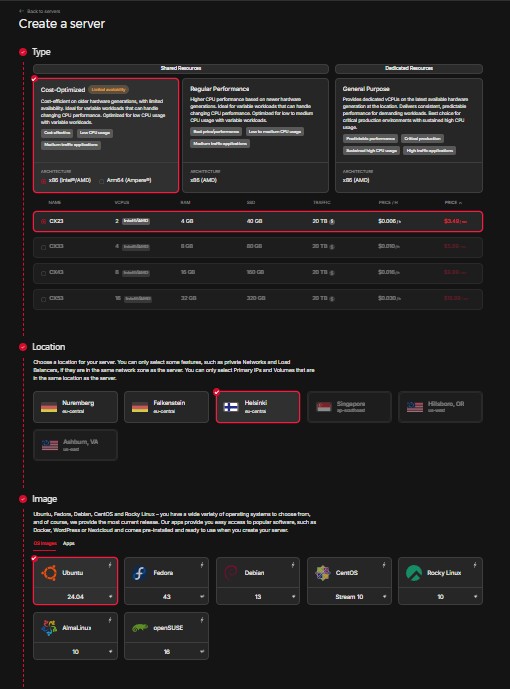
(Example of the recommended server configuration. Note: While we've selected specific specs and Ubuntu 24.04 here, exact server names and OS versions may vary as Hetzner updates their catalog.)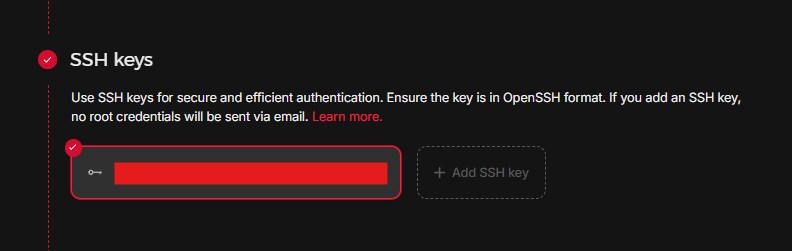
(In the 'SSH keys' section shown above, click '+ Add SSH key' to paste the public key you copied from your terminal. This securely authenticates your connection, allowing you to bypass root password requirements.)
Once deployed, your provider will show the Public IP address (Example: 123.123.123.123).
Step 4 — Link Your Domain to the Server (DNS)
Point your domain to your server's IP address in your domain provider’s DNS management panel.
Create an A Record
| Type | Name (Host) | Value (Points to) |
| A | turn |
YOUR_SERVER_IP (e.g., 123.123.123.123) |
This links the address turn.example.com to your server's IP.
Verify DNS propagation:
Open your terminal and run: nslookup turn.example.com
Expected output: Name: turn.example.com, Address: 123.123.123.123
Step 5 — Configure the Firewall
In your Cloud Provider’s Firewall settings, add these rules to allow audio traffic through:
| Protocol | Port | Description |
| TCP | 22 | SSH (Remote Access) |
| TCP | 80 | HTTP (SSL Certificate Setup) |
| UDP/TCP | 3478 | STUN/TURN Default |
| TCP | 5349 | TURN over TLS (Secure) |
| UDP | 49152–65535 | Dynamic Relay Data Ports |
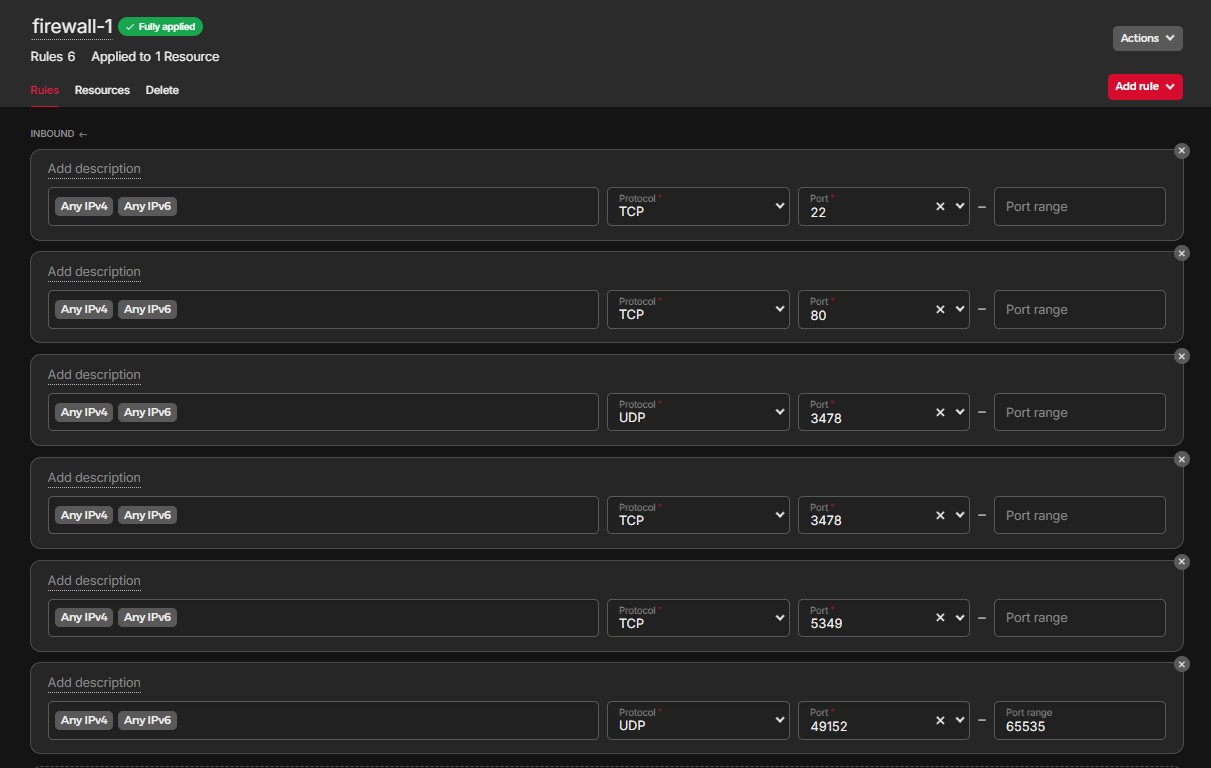
(Example of the firewall configuration.)
Attach the firewall: Firewall → Resources → Attach Resource → Select Your Server.
Step 6 — Connect to the Server
Open a terminal (Mac/Linux) or PowerShell (Windows) and connect:
ssh root@turn.example.com(Type "yes" if asked about the authenticity of the host).
Step 7 — Update the Server
Run this command to make sure the server has the latest security patches:
apt update && apt upgrade -yStep 8 — Install Required Software
Install the CoTURN relay software and Certbot (which handles your SSL certificate):
apt install coturn certbot nano -yStep 9 — Enable CoTURN on Ubuntu
By default, the server software is "off" until you enable it.
-
Open the settings file:
nano /etc/default/coturn -
Find the line:
#TURNSERVER_ENABLED=1 -
Remove the
#symbol so it looks like:TURNSERVER_ENABLED=1 -
Save: Ctrl + O, then press Enter.
-
Exit: Ctrl + X.
Step 10 — Install SSL (Let’s Encrypt)
Run this to get your free SSL certificate:
certbot certonly --standalone -d turn.example.comFollow the prompts: enter your email and type 'Y' to agree to terms.
Your certificates are now safely stored at: /etc/letsencrypt/live/turn.example.com/
Step 11 — Configure CoTURN and Login Credentials
Open the main configuration file: nano /etc/turnserver.conf
Important: Do not delete the text already in this file. Instead, jump to the very bottom to add your custom settings.
-
Mac keyboards:
Fn + Right Arrow -
Windows/Linux keyboards:
Ctrl + End
Copy and Paste This Configuration:
listening-port=3478
tls-listening-port=5349

fingerprint
lt-cred-mech

realm=YOUR_DOMAIN
server-name=YOUR_DOMAIN

cert=/etc/letsencrypt/live/YOUR_DOMAIN/fullchain.pem
pkey=/etc/letsencrypt/live/YOUR_DOMAIN/privkey.pem

no-multicast-peers
no-loopback-peers

min-port=49152
max-port=65535

log-file=/var/log/turn.log
simple-log

user=YOUR_USERNAME:YOUR_PASSWORD
Replace the Placeholders:
| Placeholder | Example |
| YOUR_DOMAIN | turn.example.com |
| YOUR_USERNAME | soundbridge |
| YOUR_PASSWORD | strongpassword123 |
Save the file (Ctrl + O, Enter) and exit (Ctrl + X).
Step 12 — Start CoTURN Service
Run these three commands to start the server:
systemctl enable coturnsystemctl restart coturnsystemctl status coturn
(If you see "Active: active (running)" in green, you are successful!)
Step 13 — Configure Your TURN Server in SoundBridge
Open SoundBridge and go to: Preferences → Virtual Collaboration
Click: Add Endpoint
Enter These Details:
-
Server Name: My Private TURN Server
-
Endpoints: (Add all three)
-
turn:turn.example.com:3478?transport=udp -
turn:turn.example.com:3478?transport=tcp -
turns:turn.example.com:5349
-
-
Username:
soundbridge(or whatever you chose in Step 11) -
Password:
strongpassword123
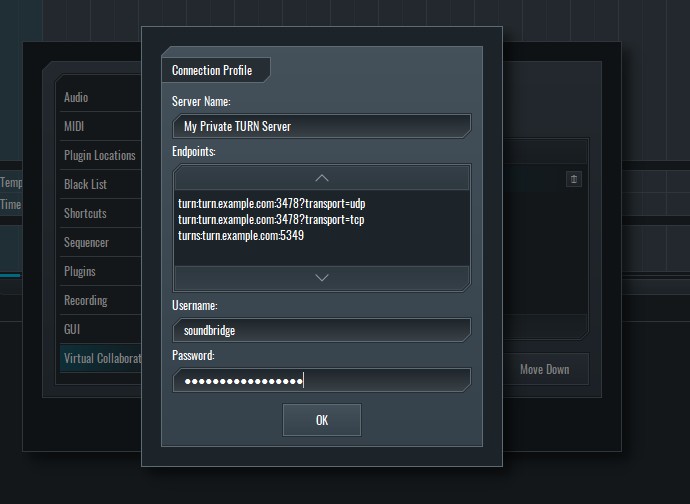
(In SoundBridge, navigate to Preferences > Virtual Collaboration > Add Endpoint to open the Connection Profile window. Enter your server details as shown above.)
Using Multiple TURN Servers
You can add servers in different regions (e.g., North America, Europe, Asia). SoundBridge will attempt to connect to all of them and use whichever one responds first. This ensures you always have the lowest latency possible.
Maintenance
-
Updates: Every few months, run
apt update && apt upgrade. -
Logs: If you have trouble, check
/var/log/turn.log. -
SSL: Certbot will automatically renew your certificates every 90 days.
MASTER MUSIC PRODUCTION
Expert-led courses designed to take you from fundamentals to finished tracks.

HOUSEFrom bouncy bass and solid kicks, this course teaches you the most modern House music production techniques needed to succeed and stand out.

TRAPQuit sounding like generic Trap and produce something World with hints of the Far East. Create ethnic soundscapes to put your Trap ahead of the curve.

AMBIENTProduce relaxing, sophisticated psy-influenced ambient. Psychedelic and relaxing to listen to, create meditative soundscapes to put your listeners in Zen.